Optimize your IAM through the seamless integration of XAAM. Our fully integrated system allows you to request rights independently via Jira Service Management.
Discover our customized Project portfolio management in Jira! Maximize efficiency, accelerate decisions and optimize the use of resources for your company's success.
Customers buy from companies that offer them the best, most seamless, and easiest digital experience.
In today’s world, speed is everything. Being the first on the market and fastest on delivering new features or fixing bugs or shipping products within a day improves user experience and customer satisfaction. Digital business processes are an incremental part of realizing this and are a must-have in a globalized world to meet the expectations of your users and customers.
Automating and digitizing processes for a consistently positive customer experience?
As consumers, customers, and employees, we are spoiled. Big eCommerce companies like Amazon have achieved almost a 100% rate of automated direct-to-consumer processes. This enabled them to offer a unique and seamless user experience along every touchpoint; from the initial contact to receiving the package at our front porch and even returning it to their warehouse.
We log in to our bank account and every transaction we have ever made can be easily checked. Transactions are automatically processed by your banks' ERP system and transmitted to a web interface. All of that happens in an instant and without any human interaction.
Remember, when you had to call an airline to book a flight for your next business trip or holiday? Remember all the hassle you had to go through? You had to talk to customer service, transmit your payment information, only to get confirmation and tickets by mail. Today you just need to search for flights on the internet, pay and you’re good to go.
Customer Experience the key to success?
How about B2B sales processes? Ask yourself, how long does it take for your enterprise to answer contact form submissions? One hour? One or two days? Even Longer? Do you have an automated delivery system to notify people in charge? Do you automatically follow up after a certain period? Do you send out an automated thank you message after form submission?
Customers want to be engaged quickly. If they don’t hear from you sometime soon, they most likely move on to one of your competitors.
So, if you take a closer look, digitized and automated business processes are everywhere, hard to miss, and part of our daily lives.
Wondering what benefits you can gain from digitizing and automating business processes? Find out more here.
Digitalization is on the rise and more important than ever before
Business processes are being fundamentally revamped in many industries to meet customers' and users' expectations. Companies that get it right can offer lower prices due to lower costs, better operational controls, and fewer risks.
But just digitizing an existing process is not enough. These processes tend to be biased, hard to go through, and not state of the art.
Digital processes should be easy to follow and built to simplify individual steps for your users or customers. You definitely should not just copy and paste an analog process into a digital environment but rather redesign and rebuild it from scratch and merge best practices with digital capabilities.
This means,
cut project steps that don’t add value to reduce complexity,
reduce the number of documents needed (often one is more than enough),
automate decision making steps and notifications,
and reduce the number of approvers to a minimum.
Digitized business processes and data collection
To meet today's standards and to outpace your competitors, acquiring and analyzing data is key to business success. Digitized corporate processes enable you to collect key data more easily and subsequently make better decisions. For example, you can collect customer support data on SLAs to improve your ITSM process, or customer behavior data in digital marketing to improve website content, ads, and KPIs.
Yet, digitizing corporate processes is just the beginning. To match the reimagined processes, operating models, skills, organizational structures, and roles often need to be redesigned.
Business team collaboration
Marketing or sales teams need to closely work together and include data in their decision-making process to delight customers along their entire journey. Marketing, for example, may learn how long and how often a specific visitor has already spent on specific pages before contacting sales. This data in return can be used by sales in future customer meetings.
Customer support and success teams can use digital tools such as Jira Service Management and well-designed support portals in conjunction with a help center to build a self-service solution. This allows them to focus exclusively on high-priority support tickets that require personal customer interaction. According to ServiceNow and Gartner, using modern ITSM solutions reduces face-to-face contact by 40% and 72%, respectively, compared to contact by phone and email.
Redesigning and digitizing a process is the first step. To fully leverage digital possibilities, new roles have to be created in your teams. Roles like Data Analyst / Scientist and User Experience Designer are two of the most important.
Conclusion
Processes can be digitized and automized for countless reasons, or business teams. But before you start, you should ask yourself: “What purpose and goal do I want to achieve?”
Getting this done beforehand simplifies the next steps and questions you need to answer. Questions like, what tools or software do we need? Do we need to hire new staff that manages the digitization, or are responsible for reaching the desired goals? How do I make sure that existing staff are able to use the new tools? Do I need to onboard them and hire an expert?
Going digital enables you not only to increase performance or to save money but ultimately will delight your customers (directly and indirectly) and thereby improve customer experience and happiness.
This might also interest you
Advantages of digital business processes
By digitizing business processes, companies benefit from a whole range of positive effects. Learn more in this article
For businesses, providing quality customer support takes a tremendous amount of effort. In order not to get bogged down in support tickets, many companies nowadays use other solutions from the field of Customer Self-Service, such as a help center or a knowledgebase.
Companies that actively use customer self-service make it easy for their customers to solve problems themselves without having to send emails or make phone calls. Today's customers are increasingly tech-savvy. This means that wherever possible, they want to find solutions to their questions themselves.
Being able to get answers to questions quickly is critical to a positive experience. According to Zendesk 40% of customers first use a self-service, such as a help center, before contacting the company's support. However, some requests will always require manual consultation, which is why a help center should not stand alone. Combining and integrating it with other support channels (such as a service desk) allows for a seamless experience here.
"One of the first things you need to know when you're learning about help centers: Self-service matters. Not a little bit... Self-service matters a lot."
Developing a successful help center is a big undertaking, both in terms of effort and importance. Choosing the right software is critical. We recommend Confluence from Atlassian for this purpose.
Confluence is a web-based enterprise wiki, in which aspects such as Knowledge management and collaboration get together (Here you can learn more about Knowledge Management). It is easy to use, promotes through simultaneous, Collaborative editing of pages and content team collaboration and allows members to provide access to knowledge and information. Among other things, Confluence is an optimal tool for writing documentation for products or other services.
Our experience: A help Center for our apps
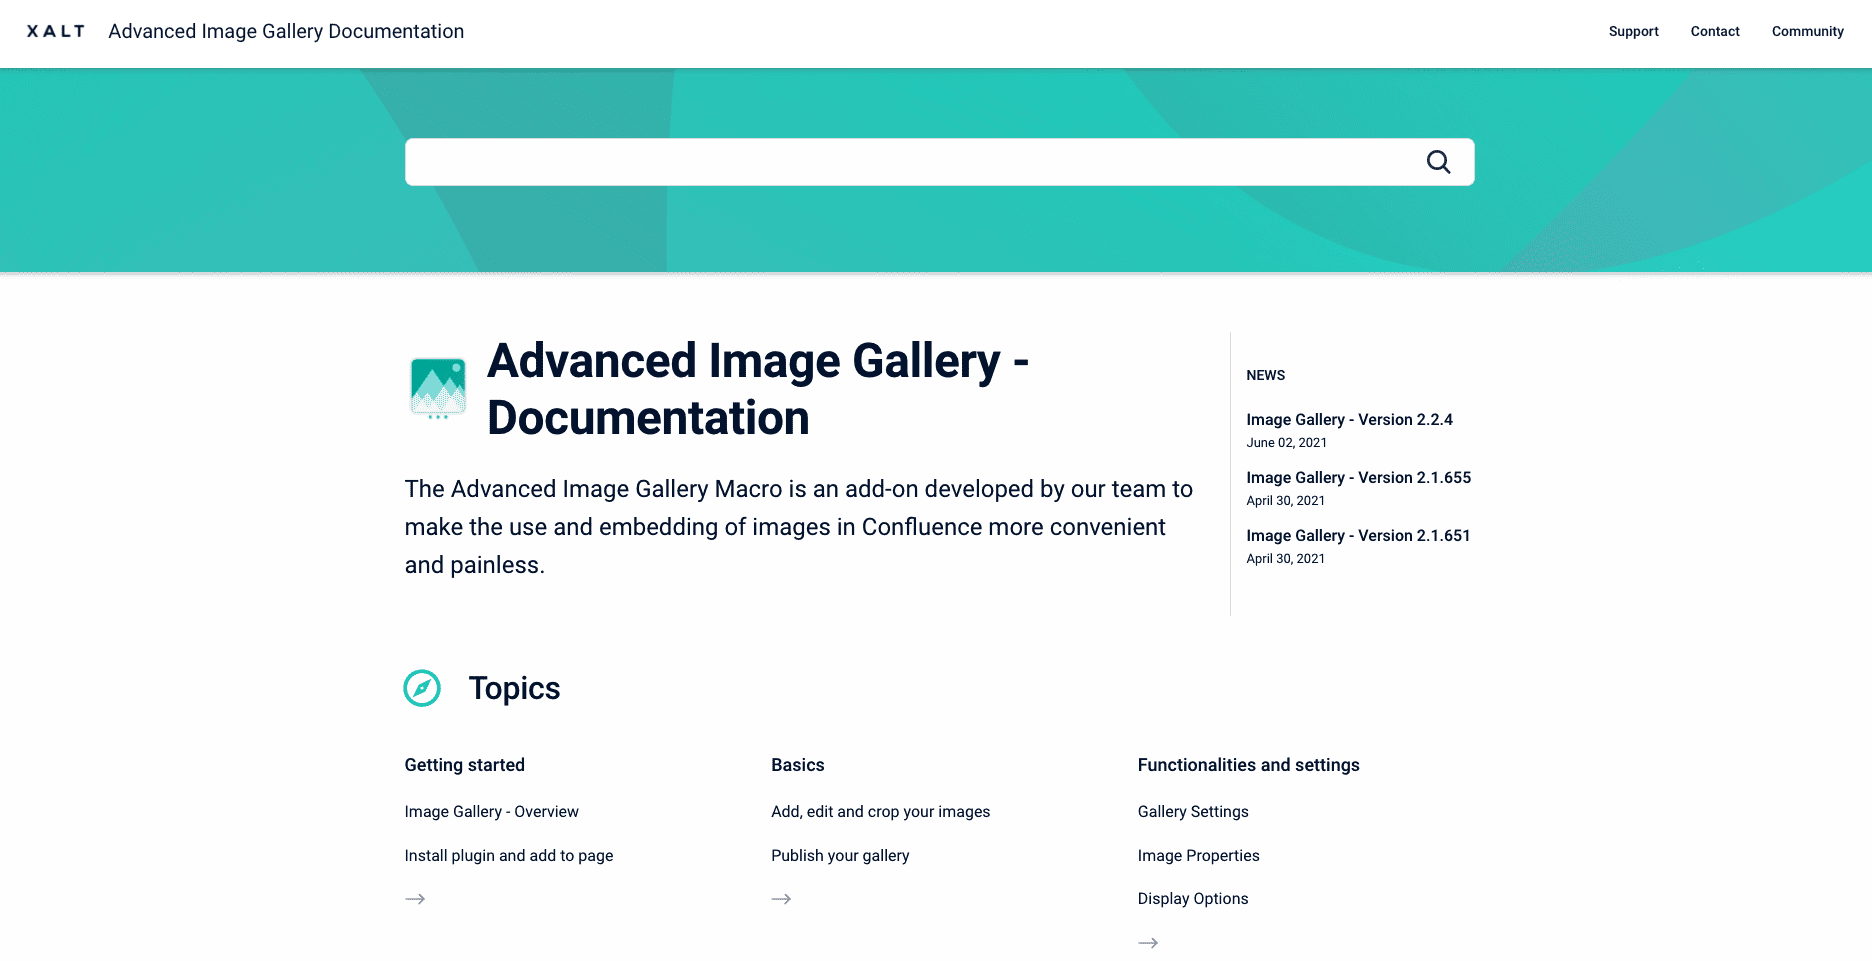
In order to make our product documentation accessible to all our users, we converted our internal Confluence area into a public Product Help Center using Scroll Viewport. The goals of the implementation were to reduce the number of support tickets for our plugins by providing mature product documentation and also relieve our support team. Furthermore, users of our plugins should be able to get fast and uncomplicated solutions to their questions as well as news about updates.
Before publishing a Confluence space, however, the question arises as to how it can best be made available to users. When publishing, the internal URLs of Confluence are still used, and there are only limited functions for adapting the layout to your corporate branding, which can confuse customers when using it. To get around this, we again recommend using the Scroll Viewport plugin from K15t.
Using a quality help center benefits both your team members and your customers. A help center increases customer satisfaction by providing better and faster service, reduces costs, and increases employee efficiency. A help center also expands your business community, presents your company as a hub of knowledge, and develops deep connections between you and your customers.
Implementation of a product help center with Confluence and Scroll Viewport
Enclosed is a step-by-step instructionshow to set up the basic framework for a public help center using the two tools mentioned, Confluence and Scroll Viewport.
Step 1: Create desired spaces and pages in Confluence
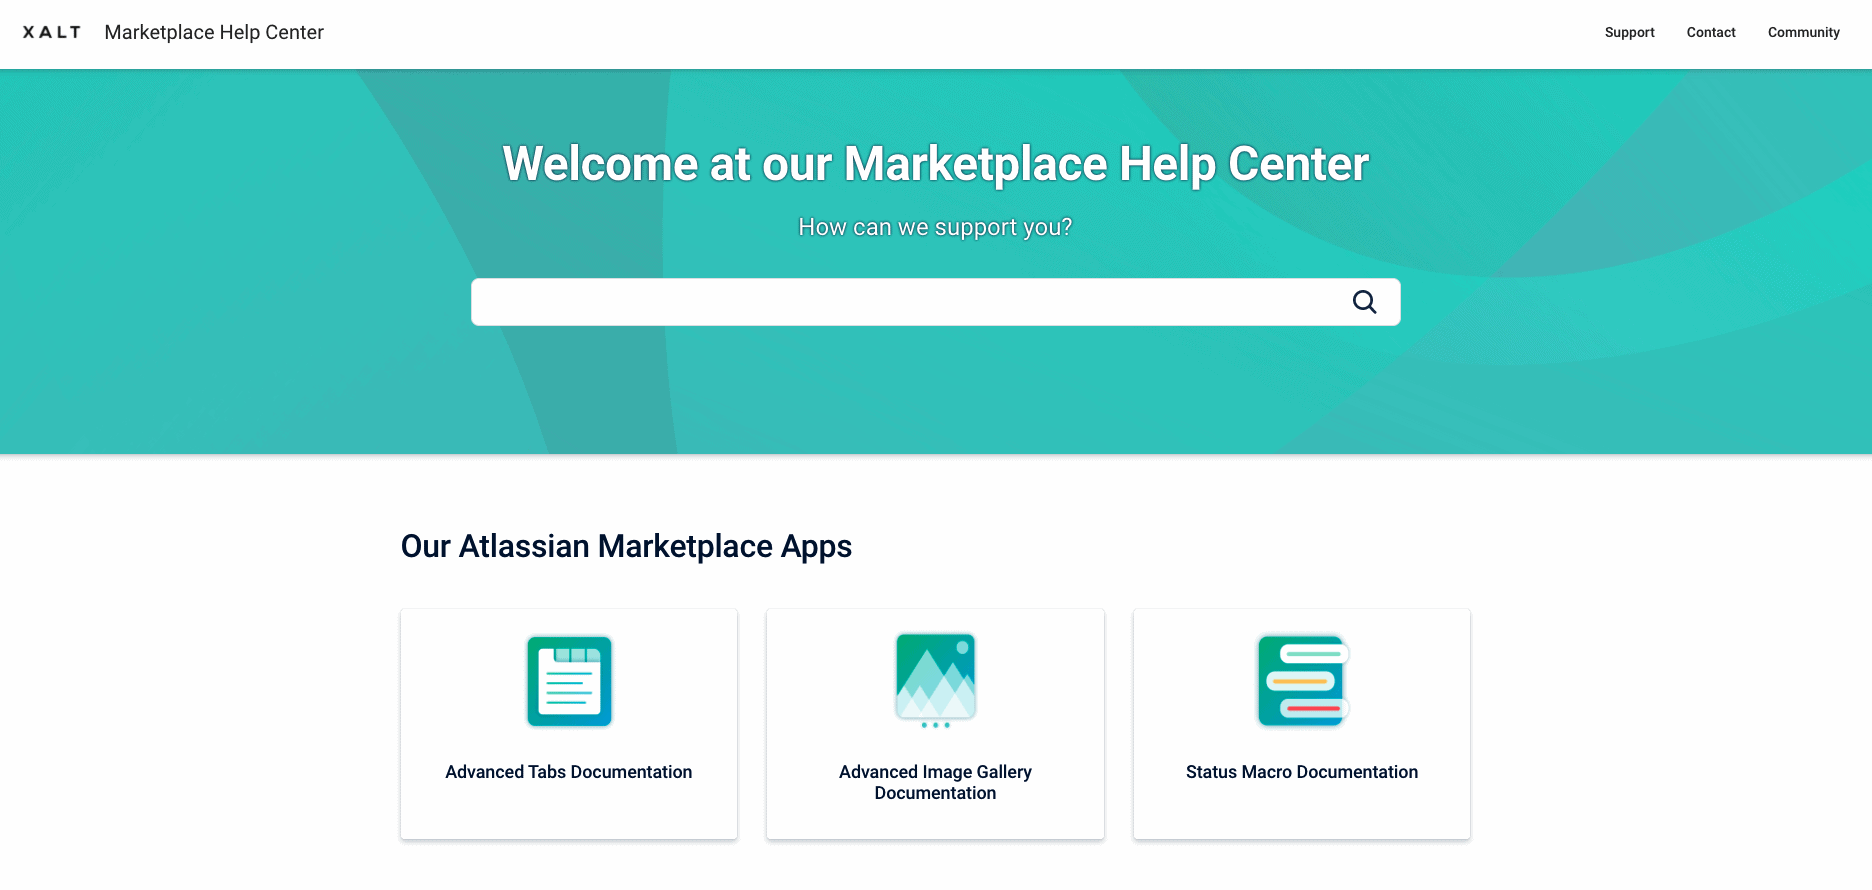
In the first step the plugin Scroll Viewport for Confluence must be installed in your Confluence instance. Instructions for installing the plugin can be found on the Atlassian Marketplace. Once the installation is done, you need to create the spaces you need for your documentation. We explain this using our Marketplace Documentation.
We have decided to create a parent section for our Marketplace App documentation with an overview of the plugins. For this, we need to create a new section in Confluence.
Click to this on the start screen Spaces in the header bar in Confluence and then on Create Space. We have created a total of 4 Spaces for our documentation so far:
Marketplace Help Center (parent space, home page of our Help Center)
Advanced Tabs Documentation
Advanced Image Gallery Documentation
Status Macro Documentation
After the space has been created, it must be opened via Configure Space the plugin Scroll Viewport on the pages activates become Click on Appsthen click on the Tab Scroll Viewport and on Create Viewport.
Step 2: Connect the individual spaces with each other
Thus, a separate viewport must be created for each space in Confluence. An important step here is to define the structure and hierarchy of the pages. Several individual viewports can be combined into a hierarchical viewport collection. At the beginning, a section must be defined as Root viewport is set, in our case the Marketplace Help Center Space.
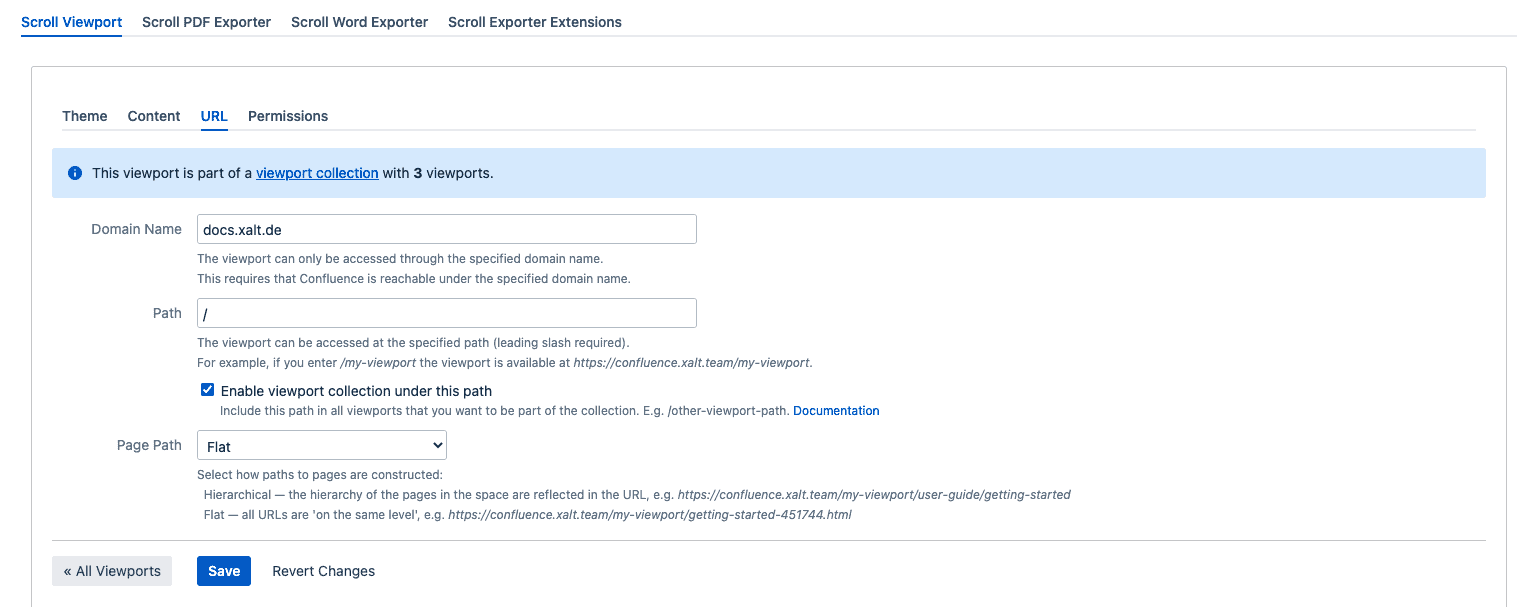
To do this, navigate to the space that you want to Root viewport, and navigate to the Apps - Scroll Viewport - URL. Click on Enable viewport collection under this path and save your changes. This space now represents with the stored domain name the Root of the Help Center.
In order to include other spaces, which belong to the documentation, under the Root viewport, you need to edit the individual viewports in each of these spaces. To do this, navigate to the desired space, make sure that the same theme is selected and click again on URL. Now enter in the URL field on the one hand the domain of the Root Viewports. In our case this is docs.xalt.com. Under Path, continue to add the desired path name for the space. We have abbreviated the documentation for our Advanced Image Gallery Plugin to AIGDOC (=Advanced Image Gallery Documentation).
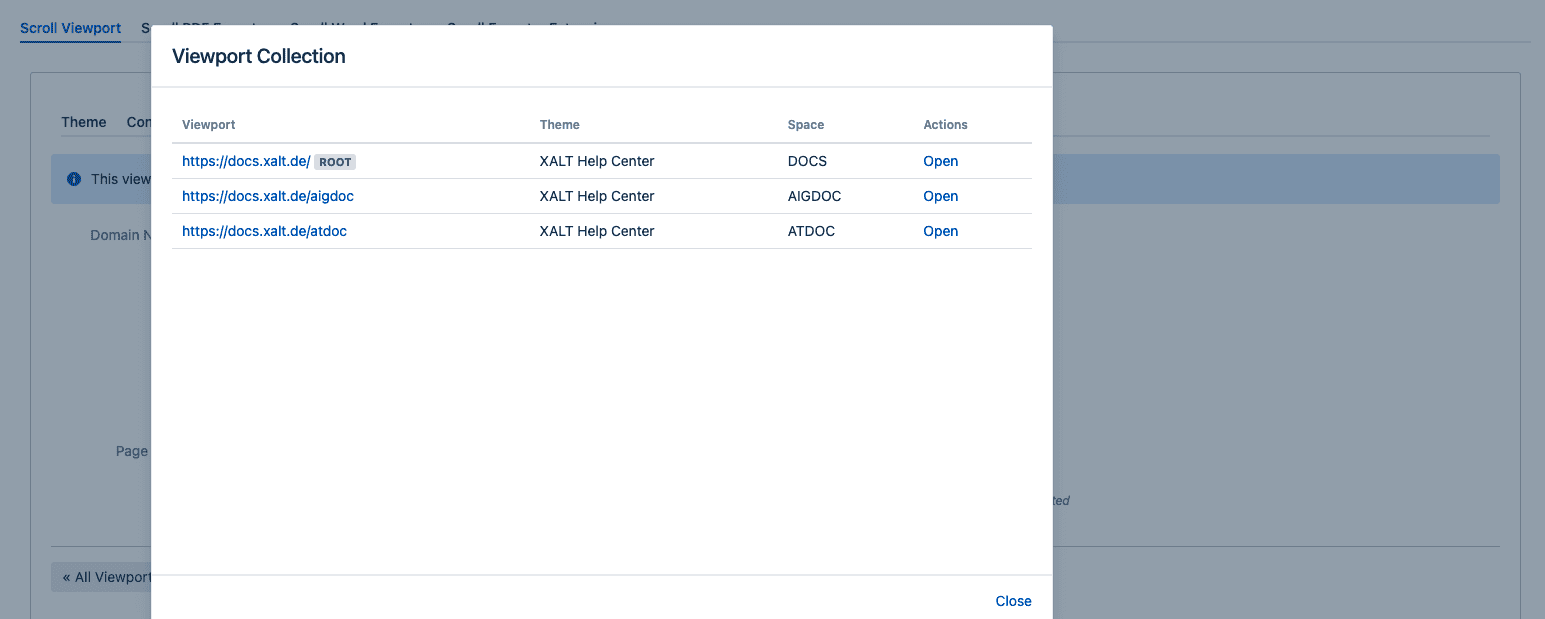
If the root viewport contains the path docs.xalt.com the range for our plugin is now docs.xalt.com/AIGDOC. You have to make these changes for all spaces you want to include in the structure of your Help Center. Above the URL field you can still get an overview of the Viewport Collection with all stored spaces.
Detailed descriptions about the possibilities of the structures as well as the viewport collections can be found in the documentation of k15t. We recommend the articles Structure Your Help Center and Group Viewports in a Collection.
Step 3: Set the layout and theme for each page
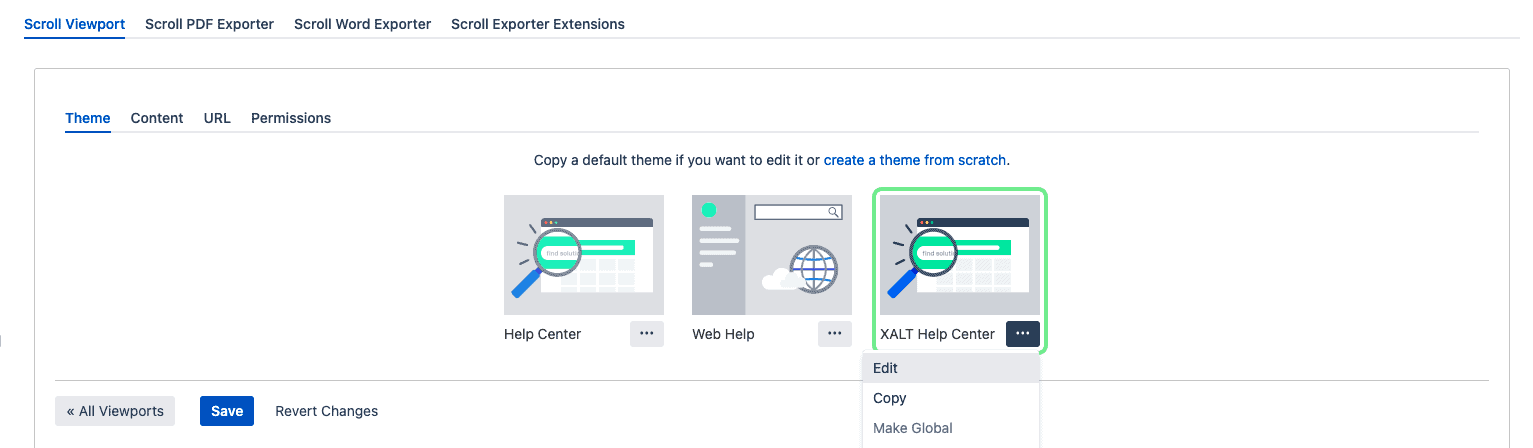
For the layout of the Help Center, the Scroll Viewport Theme Editor is used. Click for this on Theme. Here you can distinguish between the Themes Help Center and Web Help or create a new theme. We recommend to start with the Default Theme employable. The default themes cannot be edited directly, but must be copied and duplicated. Kick for the three points on this one. Click to copy and name your new theme.
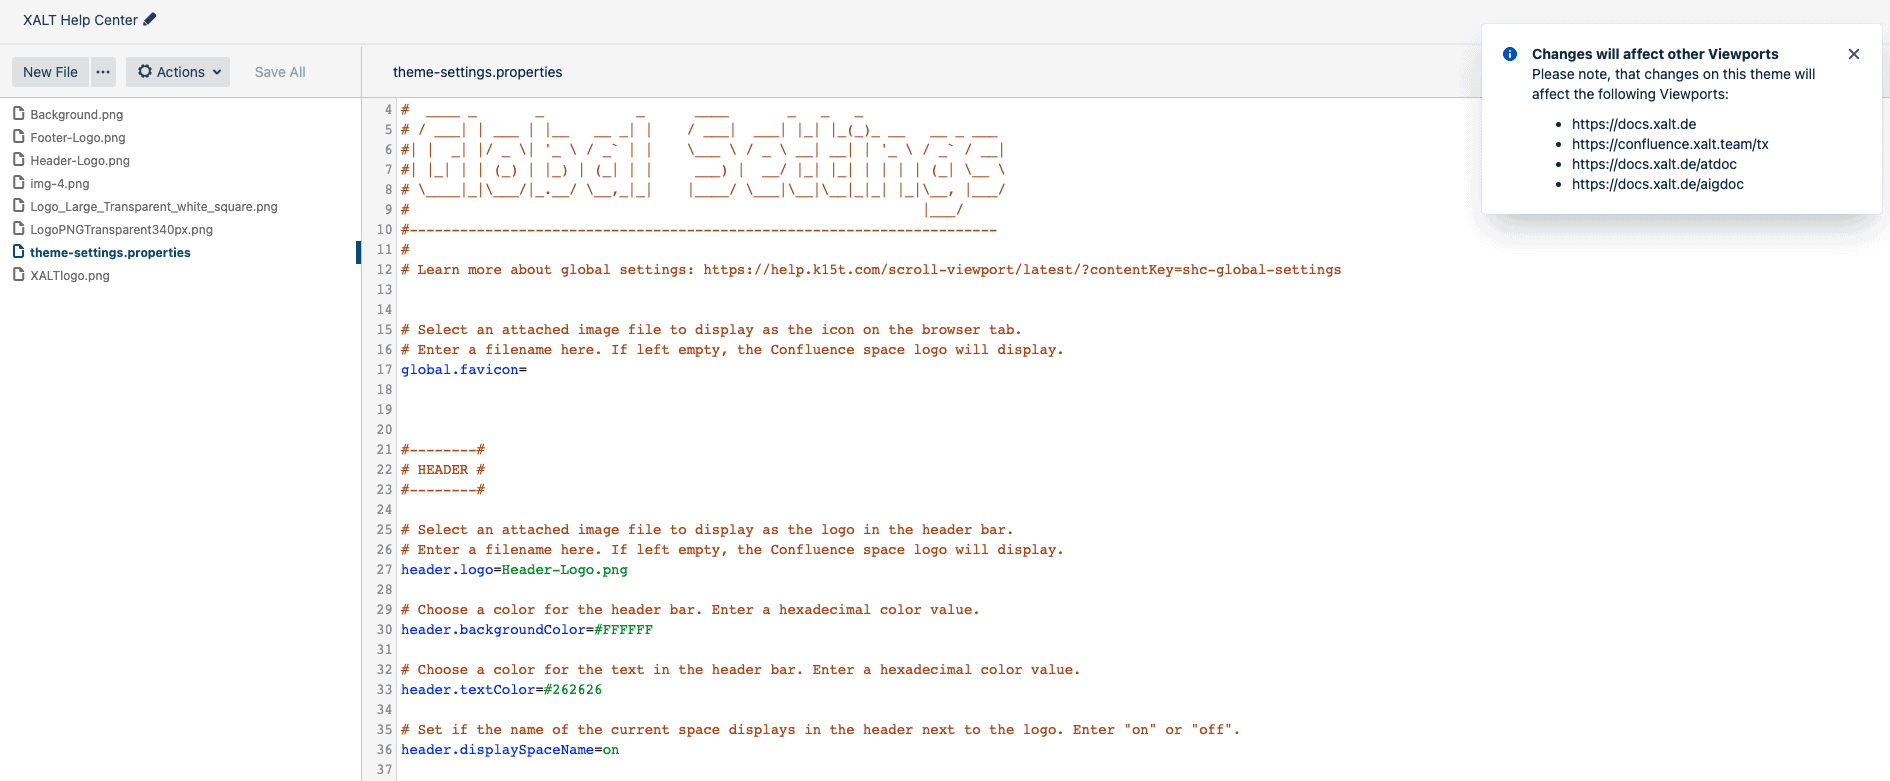
To make settings in the theme, click Edit. This opens the Scroll Viewport Theme Editor by the theme-settings.propertiesin which the theme settings are made.
Pro Tip: What Theme and other layout aspects, such as font type and size, are fully customizable. However, this is not included in the standard functions of Scroll Viewport. Changes have to be implemented separately with CSS. We would be happy to support you with an individualized solution for your help center.
In the Scroll Viewport Theme Editor you can basically four spaces of the Help Center can be edited. These include the
global settings, such as the header and the footer,
the settings for the Help Center start page, such as the banner and the headline,
the settings for the space start page, such as the display of the contents and the news as well as
the individual pages.
Basically, there is no generally valid guidance in the setting of the theme. The settings should be implemented according to your own needs and ideas. We therefore recommend to use different settings as described in the Scroll Viewport Theme Editor described above.
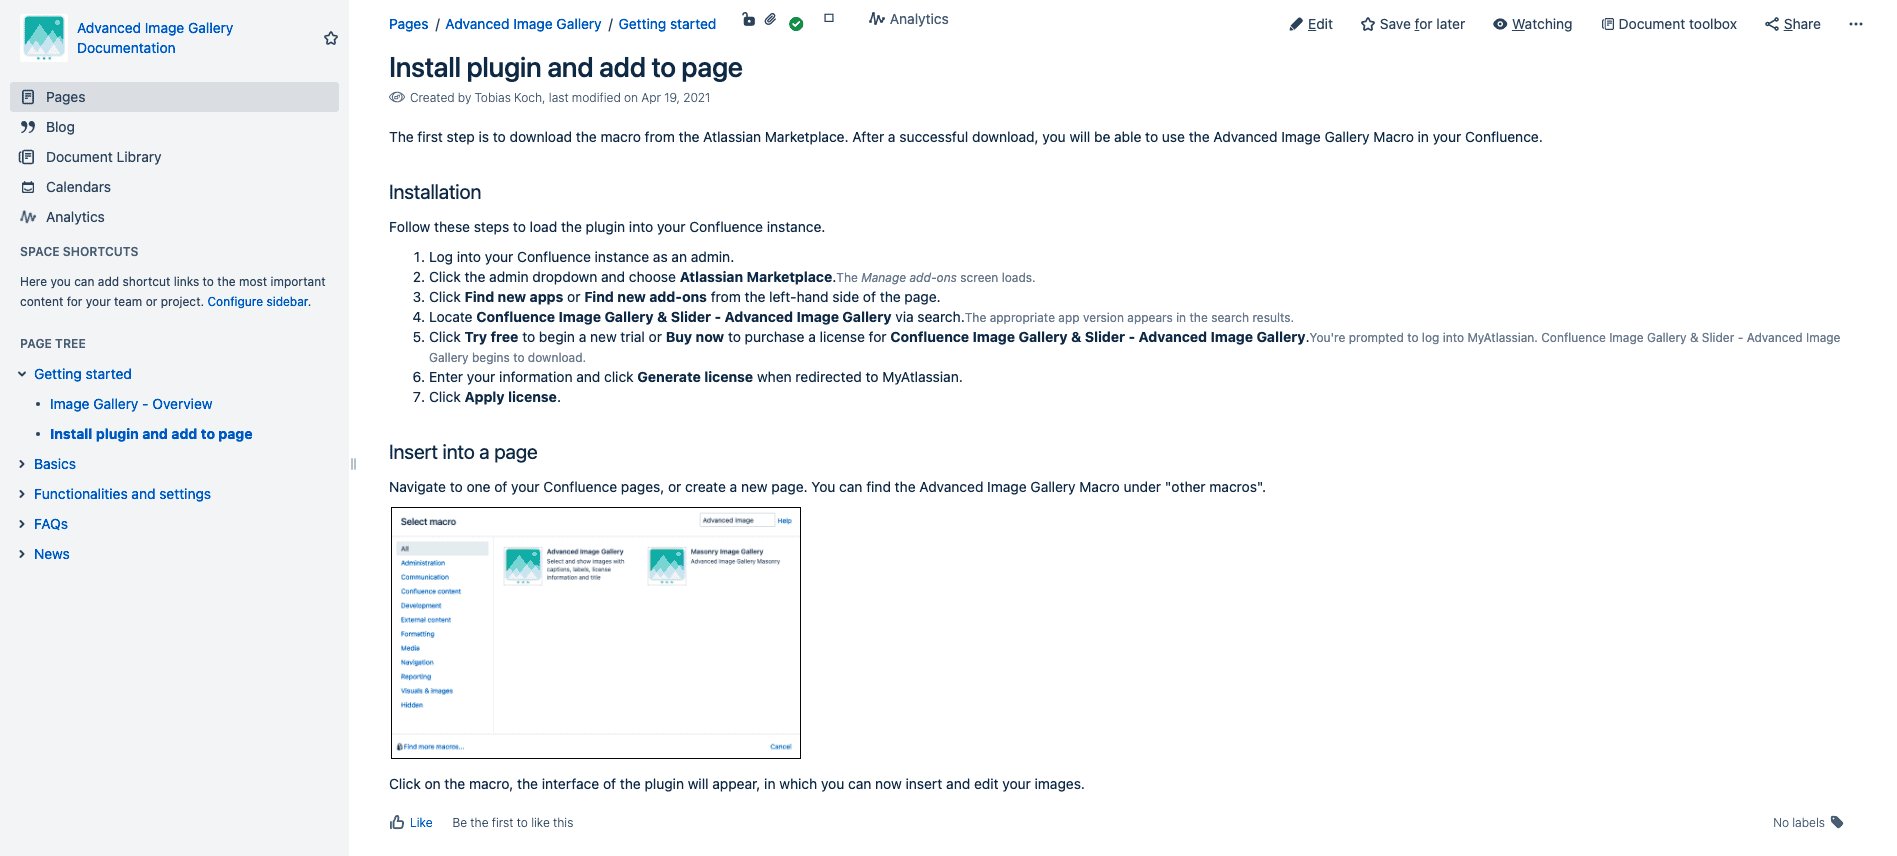
The Results can be viewed either via the preview in Apps - Scroll Viewport - Theme or directly in the final view. Navigate to the Help Center home page or to a page within the documentation. Click the Scroll Viewport icon next to the page metadata, and then click Open.
Step 4: Fill the Confluence pages with content, images and instructions
Is the Structure of the Help Center built up, you can start filling the pages with content. Basically, help center articles are not much different than helpful blog posts. Users should be encouraged to read with a clearly formulated headline.. Useful Instruction steps as well as links to further helpful documents are intended to give the reader the opportunity to put the information presented into practice.
Furthermore, it should be ensured that the textual content is always supplemented by additional image and video material. For documentation purposes, screenshots (incl. annotations) of the individual steps are usually suitable.
Three building blockswhich we install in each space are one page each to Getting startedthe FAQs and the News. Getting started provides a compact overview of the installation of the plugin as well as the most important hard facts of the app, e.g. for which product and which hosting type the plugin is available. Especially the FAQ page is an important part of the help center. The FAQs should, however, be considered in the light of the support tickets be created. Frequently asked support questions, such as requests for new functions, are included in the FAQ page and should contain answers that are as precise as possible.
In order for the documentation to be publicly discoverable, it must be available under Configure Space - permissions at Anonymous users finally still a hook with View can be set. Anonymous users can be given almost any permission, but we recommend that you limit this to viewing and commenting.
Pro Tip: Formulate the titles of your articles in such a way that they can be easily found via the search function in the Help Center. A keyword analysis usually makes sense here to find out which search terms and phrases your users use when they are looking for a solution to their problems. The findability can be further improved by the use of keywords in the text as well as through deposited labels.
This is how you can implement it yourself
Developing a help center does not automatically ensure that your customers will actually use it and see it as a source of help. On the one hand, customers must be able to find answers to their questions quickly (faster than with live support). On the other hand, customers must be able to understand and implement the content and assistance in your help center. This in turn brings aspects such as user experience, design, structure and layout to the forefront, which must be taken into account during development.
Our support
With good advice, the creation and maintenance of a help center is much easier. We therefore recommend contacting a qualified implementation partner of your choice, who can provide you with support during the implementation. In addition, the following points should definitely be observed:
Define goals early: The first step in the creation of a help center should be to consider what the help center is intended to accomplish. Do you want to reduce the workload by processing support tickets to relieve your team? Do you want the Help Center to improve the relationship and connection with your customers? Or both? Think about it and set the right goals for your business.
Understanding the needs of customers: Use internal company knowledge to be able to identify the expectations of your customers. Use formulations and structures in the help center that are understood by your target groups and arouse their interest. If answers are provided that are not understood by the target group, the help center is not fulfilling its purpose.
Actively involve employees: Let your employees take an active role in the design of the Help Center. These can provide important input on the wishes and behaviour of customers.
Focus on user experience and data analysis: A good user experience is the be-all and end-all. If the UI isn't excellent, visitors to your help center won't stay there long, let alone return. Create a simple and fast navigation to the most important articles, in combination with a search function. Measure other performance parameters of your help center, such as the number of hits on specific articles and the time spent in the help center.
Jira Service Management (also known as Jira Service Desk) is one of the most comprehensive and widely used ITSM tools. Whether it's internal requests to IT departments or external requests for help, Jira Service Management (JSM) not only gets your team involved immediately and directly, but the people making the requests also get immediate feedback. Such requests are usually created with the Issue Collector and or dedicated service desk portals.
A typical use case of JSM can be found in IT related areas in companies, e.g. when employees discover a software bug, they can directly raise a ticket via JSM, which can then be processed by the IT or development team. Working with Jira tickets is an essential component of successful, agile working methods and is indispensable in many modern tech companies today.
But it's not just tech companies that can use JSM for their processes and workflows, and they don't have to limit themselves to IT requests either. Jira Service Management offers almost endless possibilities to accelerate your business. In our blog post Fast and efficient application processes with Jira we already presented our solution on how to use JSM for applicant management. In this second part, we will show you how to not only receive applications via an email inbox linked to a Jira project which converts them into Jira tickets, but also how to use the issue collector to achieve the same result.
With a so called Issue Collector, a Jira feedback form can be embedded on your own websites. By clicking on the corresponding trigger - which has to be defined and can be a call-to-action, a button, an image etc. - this form can be opened and after filling it out, a Jira ticket (also called issue) can be easily created. The fields of the form can be customized and request essential information, e.g. the applicant's cover letter as a text field, their email address for notifications and communication, file attachments for resumes, job references, etc.
Why does an issue collector make sense?
As explained in the first part of the blog series, an email inbox can be set up and linked to your Jira project fairly easily. All emails that are sent to the configured inbox automatically create a Jira issue that contains all the information and attachments from the email. However, the email inbox may not only receive relevant emails or applications, but also requests from external headhunters or marketing emails. These are then also created as issues in the JSM project and have to be filtered out, which can be cumbersome.
In addition, you may want to invite your applicants to apply directly on the homepage and not use a cumbersome job portal or applications via email. With an issue collector triggered by a button click, the web layout is not disturbed and applicants are not redirected to other pages.
It's easiest to understand by looking at any Job on our career page: xalt.de/en/jobsIn our single job posts, you will quickly see what we are talking about. For example, scroll down on this page until you see the button "Apply directly" and click on it. Don't worry, an application will not be sent to us immediately. Once you click the button, a popup will open which contains the Issue Collector of Jira Service Management.
And how do you set up the Issue Collector?
Step one: Creating the Issue Collector
Select the Jira project for which you want to enable ticket creation via the Issue Collector.
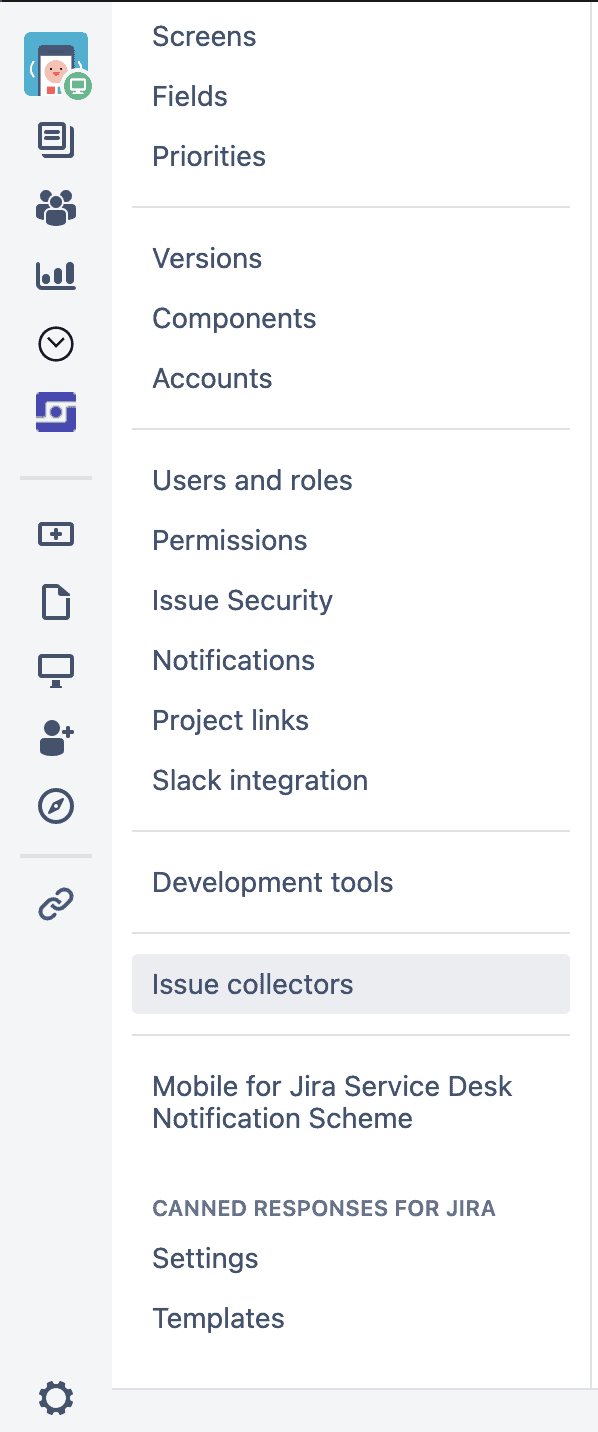
Navigate to the Project settings and scroll down until you see the Issue Collector field:
Jira menu
Once there, create a new Issue Collector.
Step two: Setting everything up
In the next window, the name and description of the issue collector can be added and you can set the default reporter for tickets. In this case, the option "Attempt to match submitter email address" can be selected, if the email specified in the issue collector matches a user in their Jira instance, this person will automatically be set as the "reporter" of the ticket.
If external users (e.g. applicants or anyone who doesn't already have an account in your Jira directory) should automatically be set as the reporters of the created ticket, groovy scripts and postfunctions have to be created, which will be explained in-depth in a future blog post. If this feature is already needed, feel free to contact us and we'll be happy to help you out.
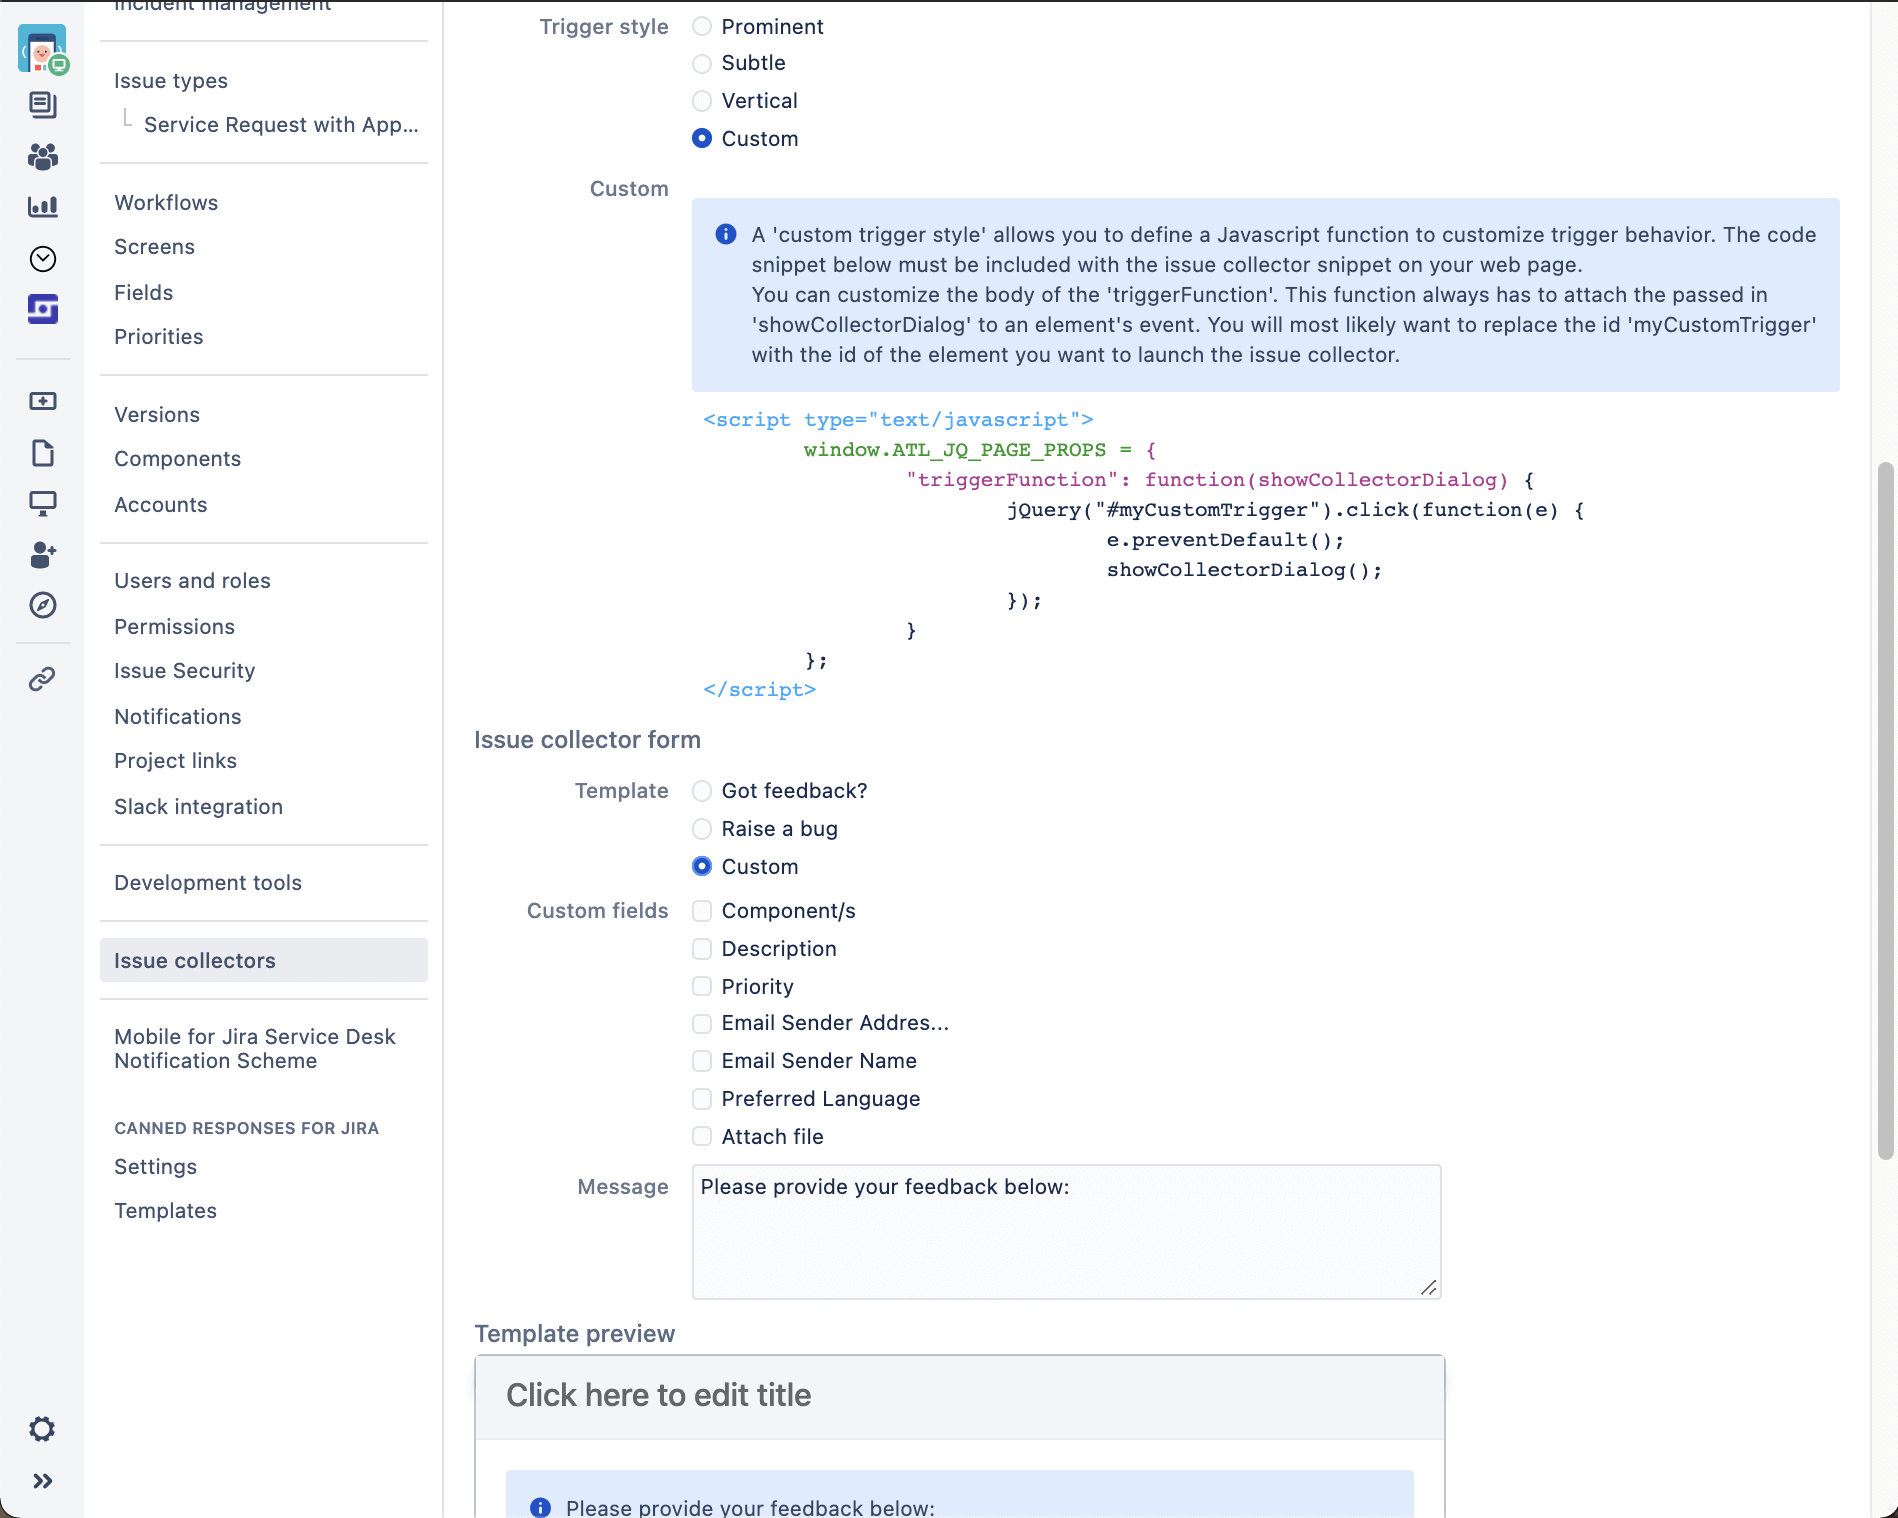
Back to the Issue Collector: In this window the Trigger can be defined and a preview of the form can be viewed.
To do this, first click on "Custom trigger".
Issue Collector Configuration in Jira
Now click on "Custom" under "Issue collector form". Here you can now define the fields of the application form.
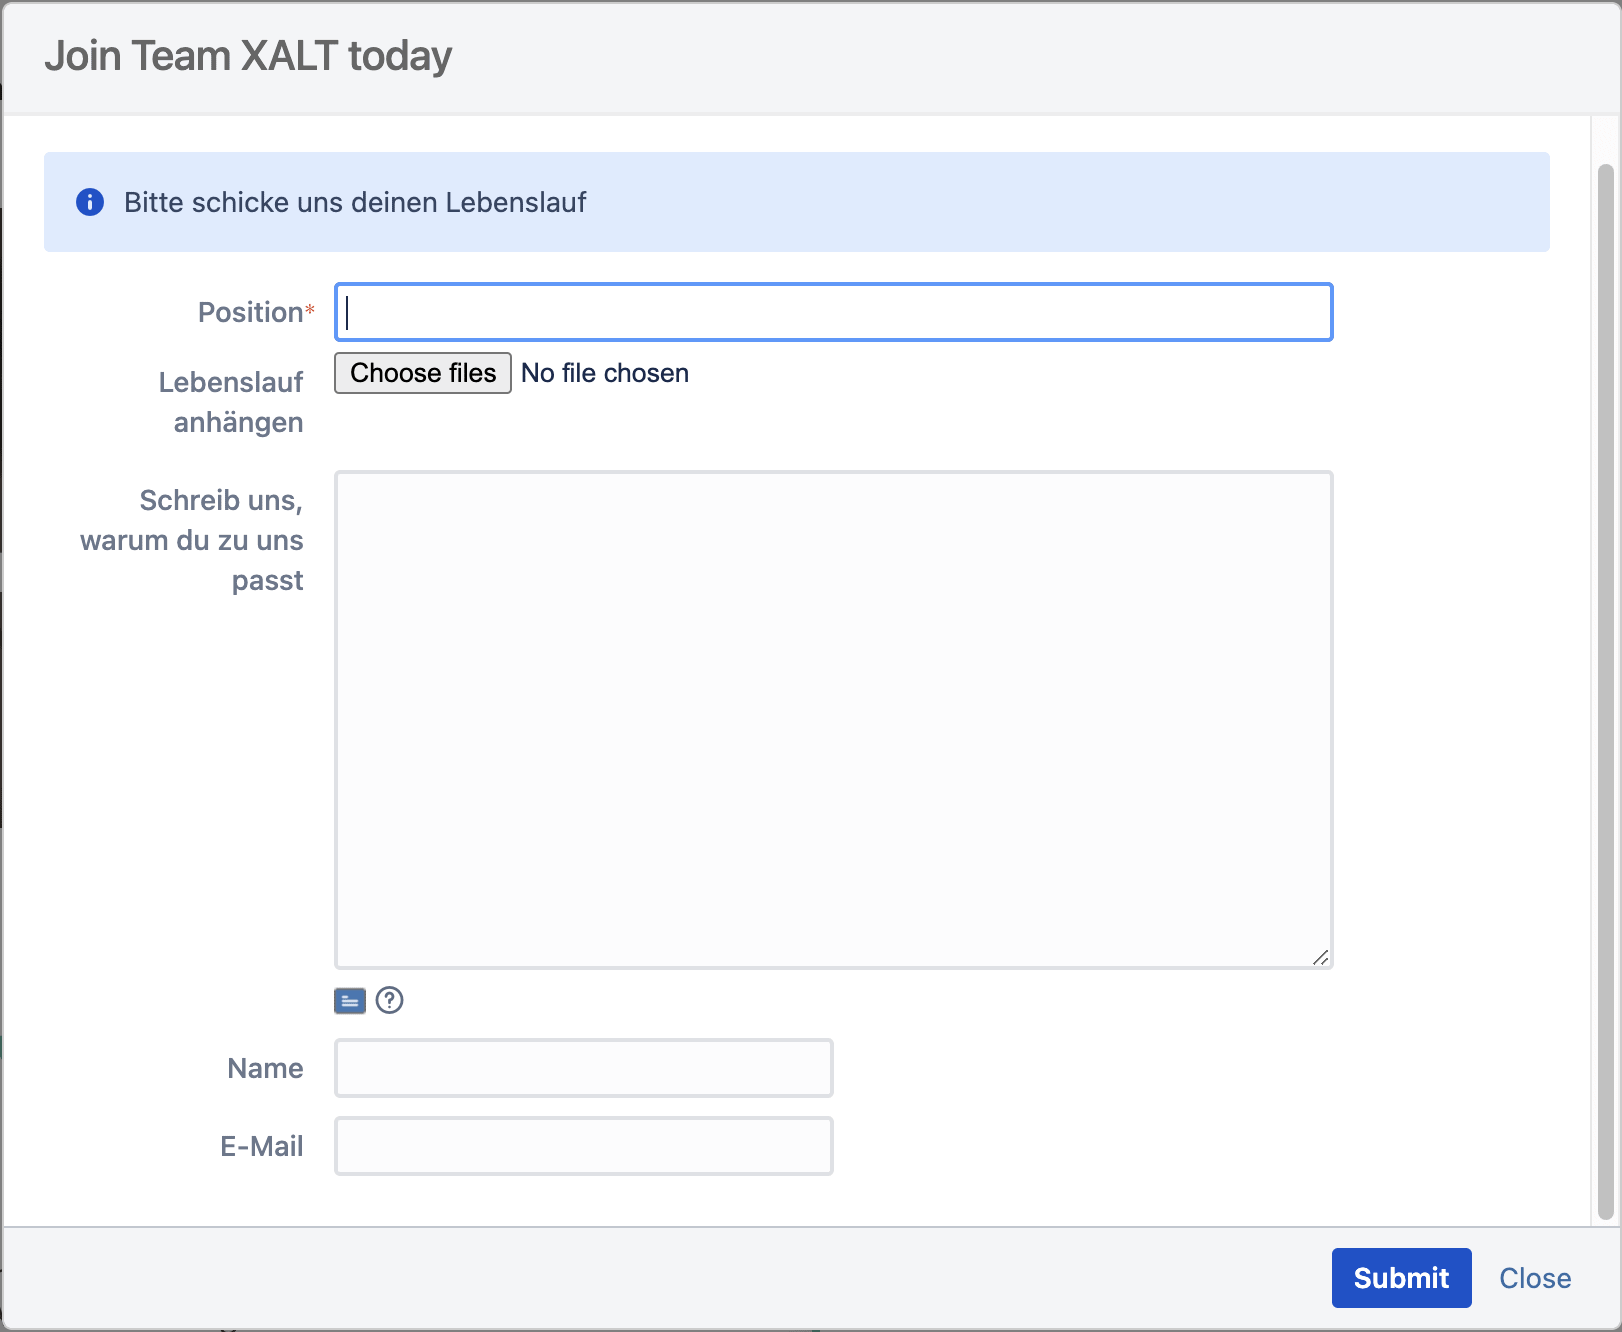
For our example, we decided to use a simple application form. The field "Position" is the title of the ticket created, so that our HR manager knows immediately to which position the application is addressed.
Preview: Jira Form
When you are done, save the Issue Collector and you will be taken to the next window.
Recruiting with Jira Service Management - Without external tools
Manage your applications directly in Jira. Automate and digitize your recruitment process.
How do I integrate the Issue Collector on websites (HTML or Javascript)?
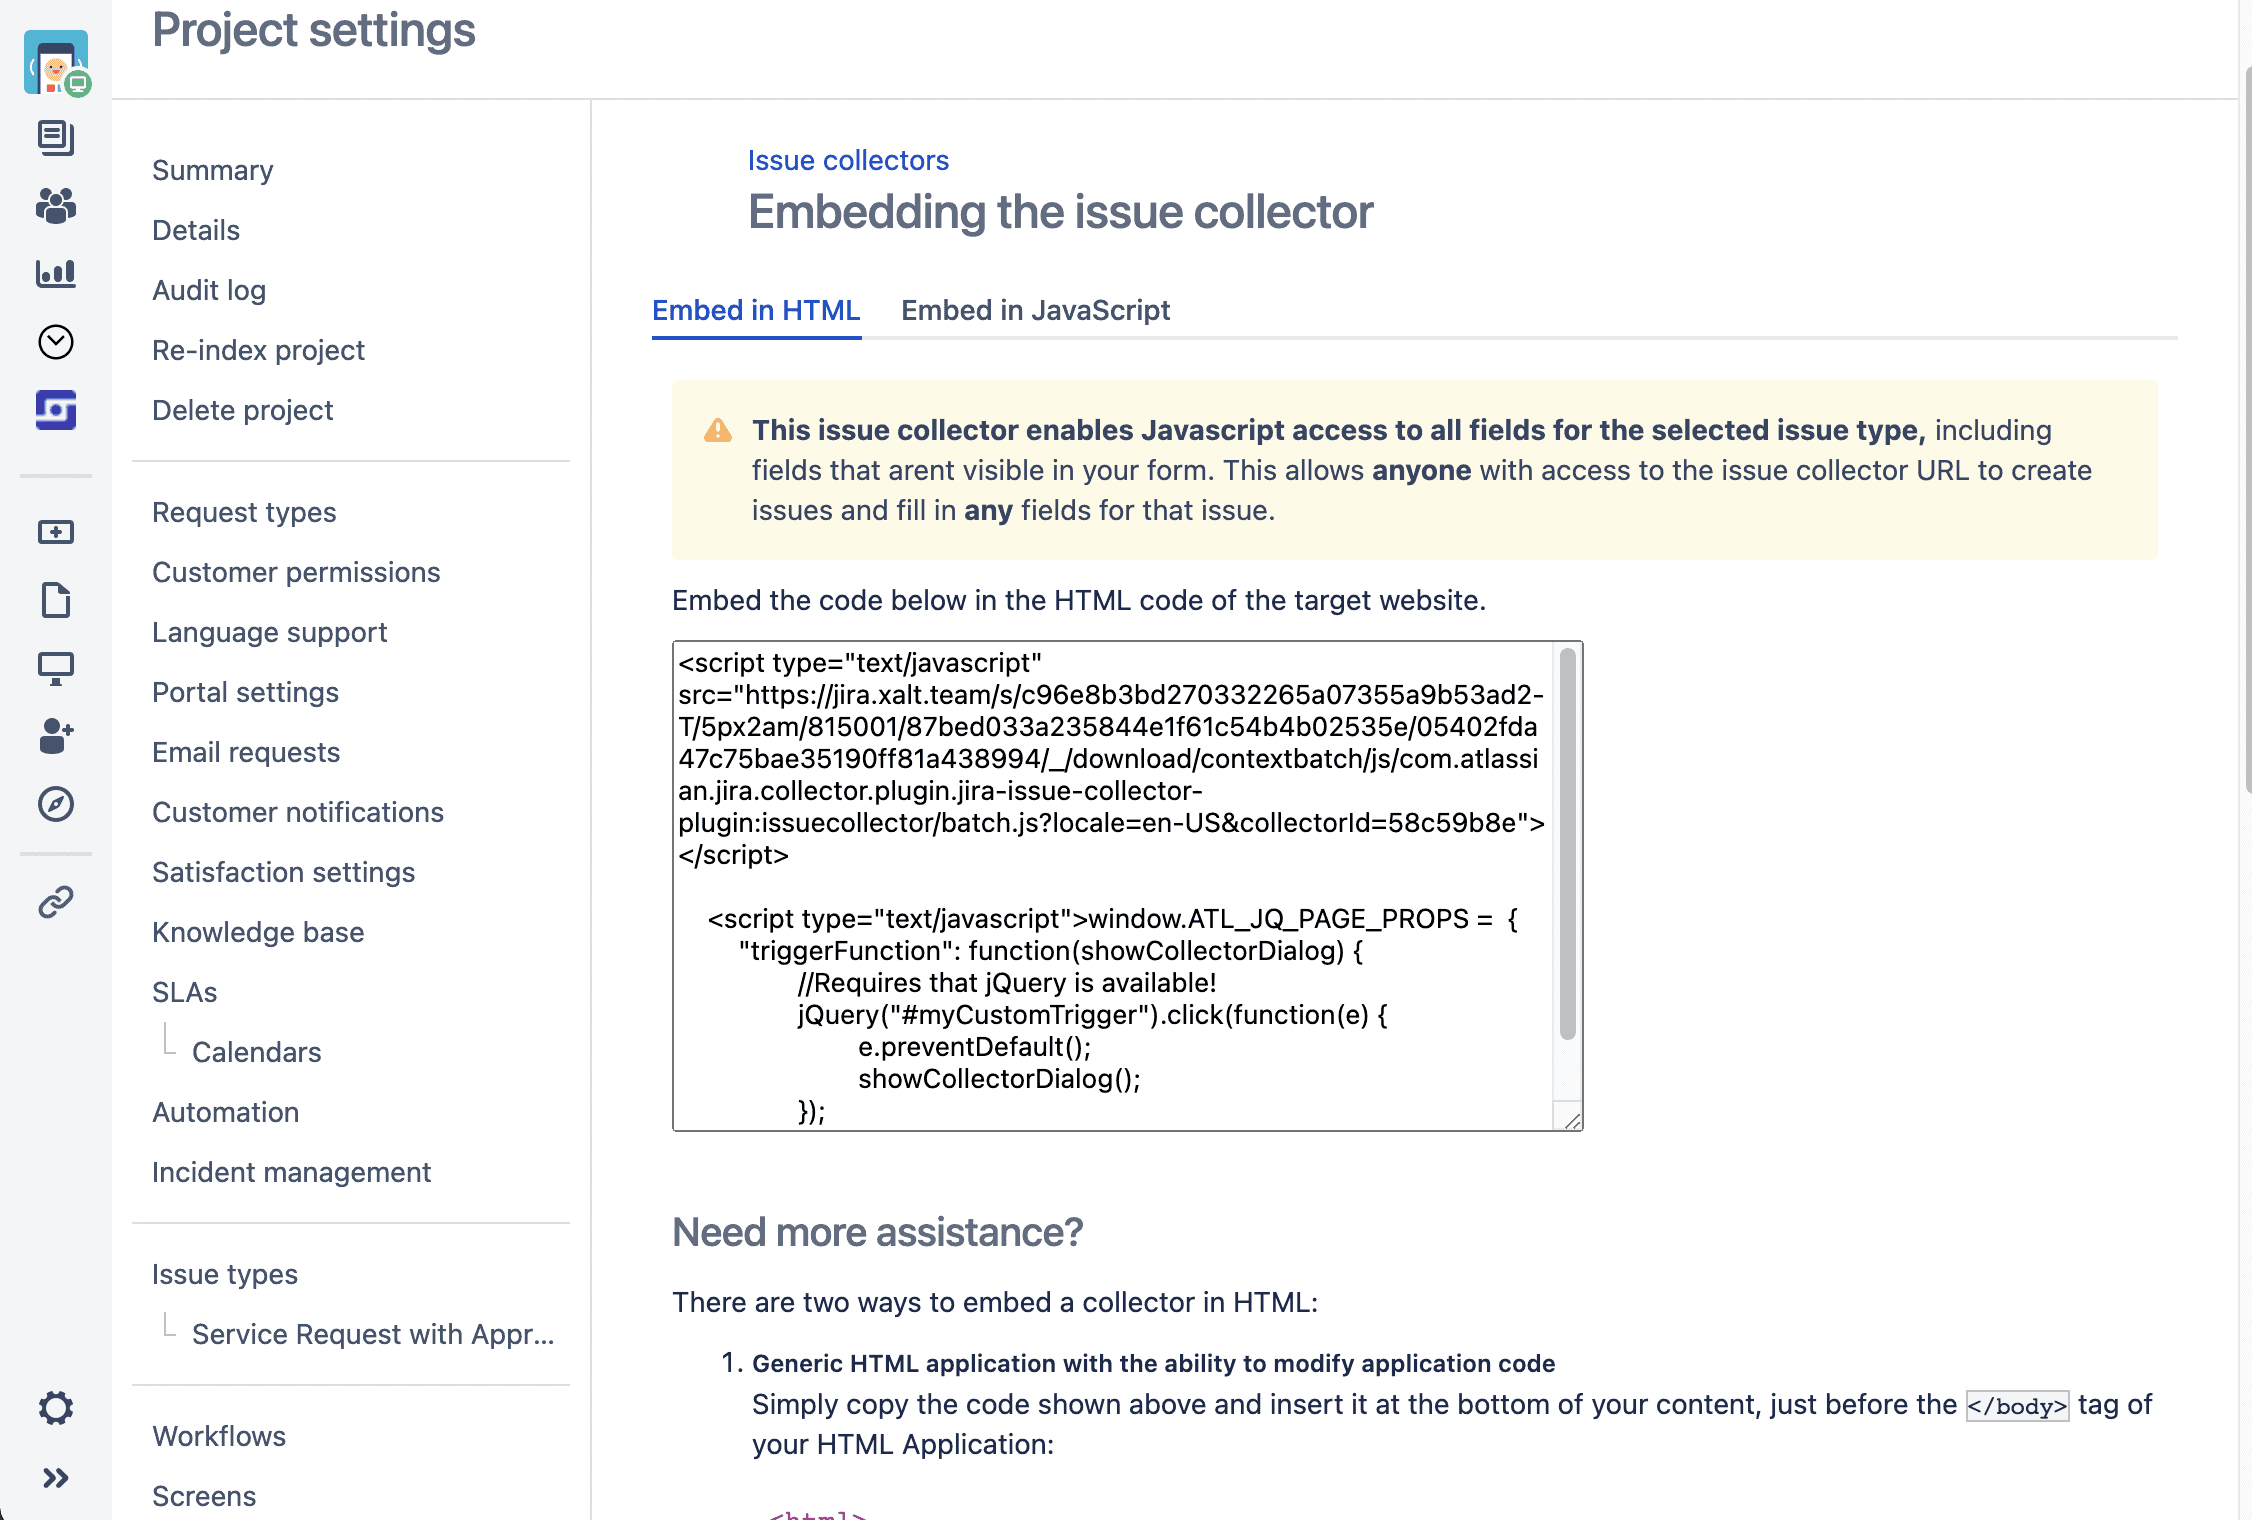
Step Three: The HTML snippet
On this page you get the HTML-snippet, or Javascript needed for the embedding. Copy the code into the clipboard or into a text editor.
Jira Issue Collector
The next step is to define the custom trigger, i.e. how the issue collector can be opened by applicants. We settled for a simple call to action button, but any element on a website can be set as a trigger, e.g. also images or similar.
Step four: Embedding the Issue Collector on the website
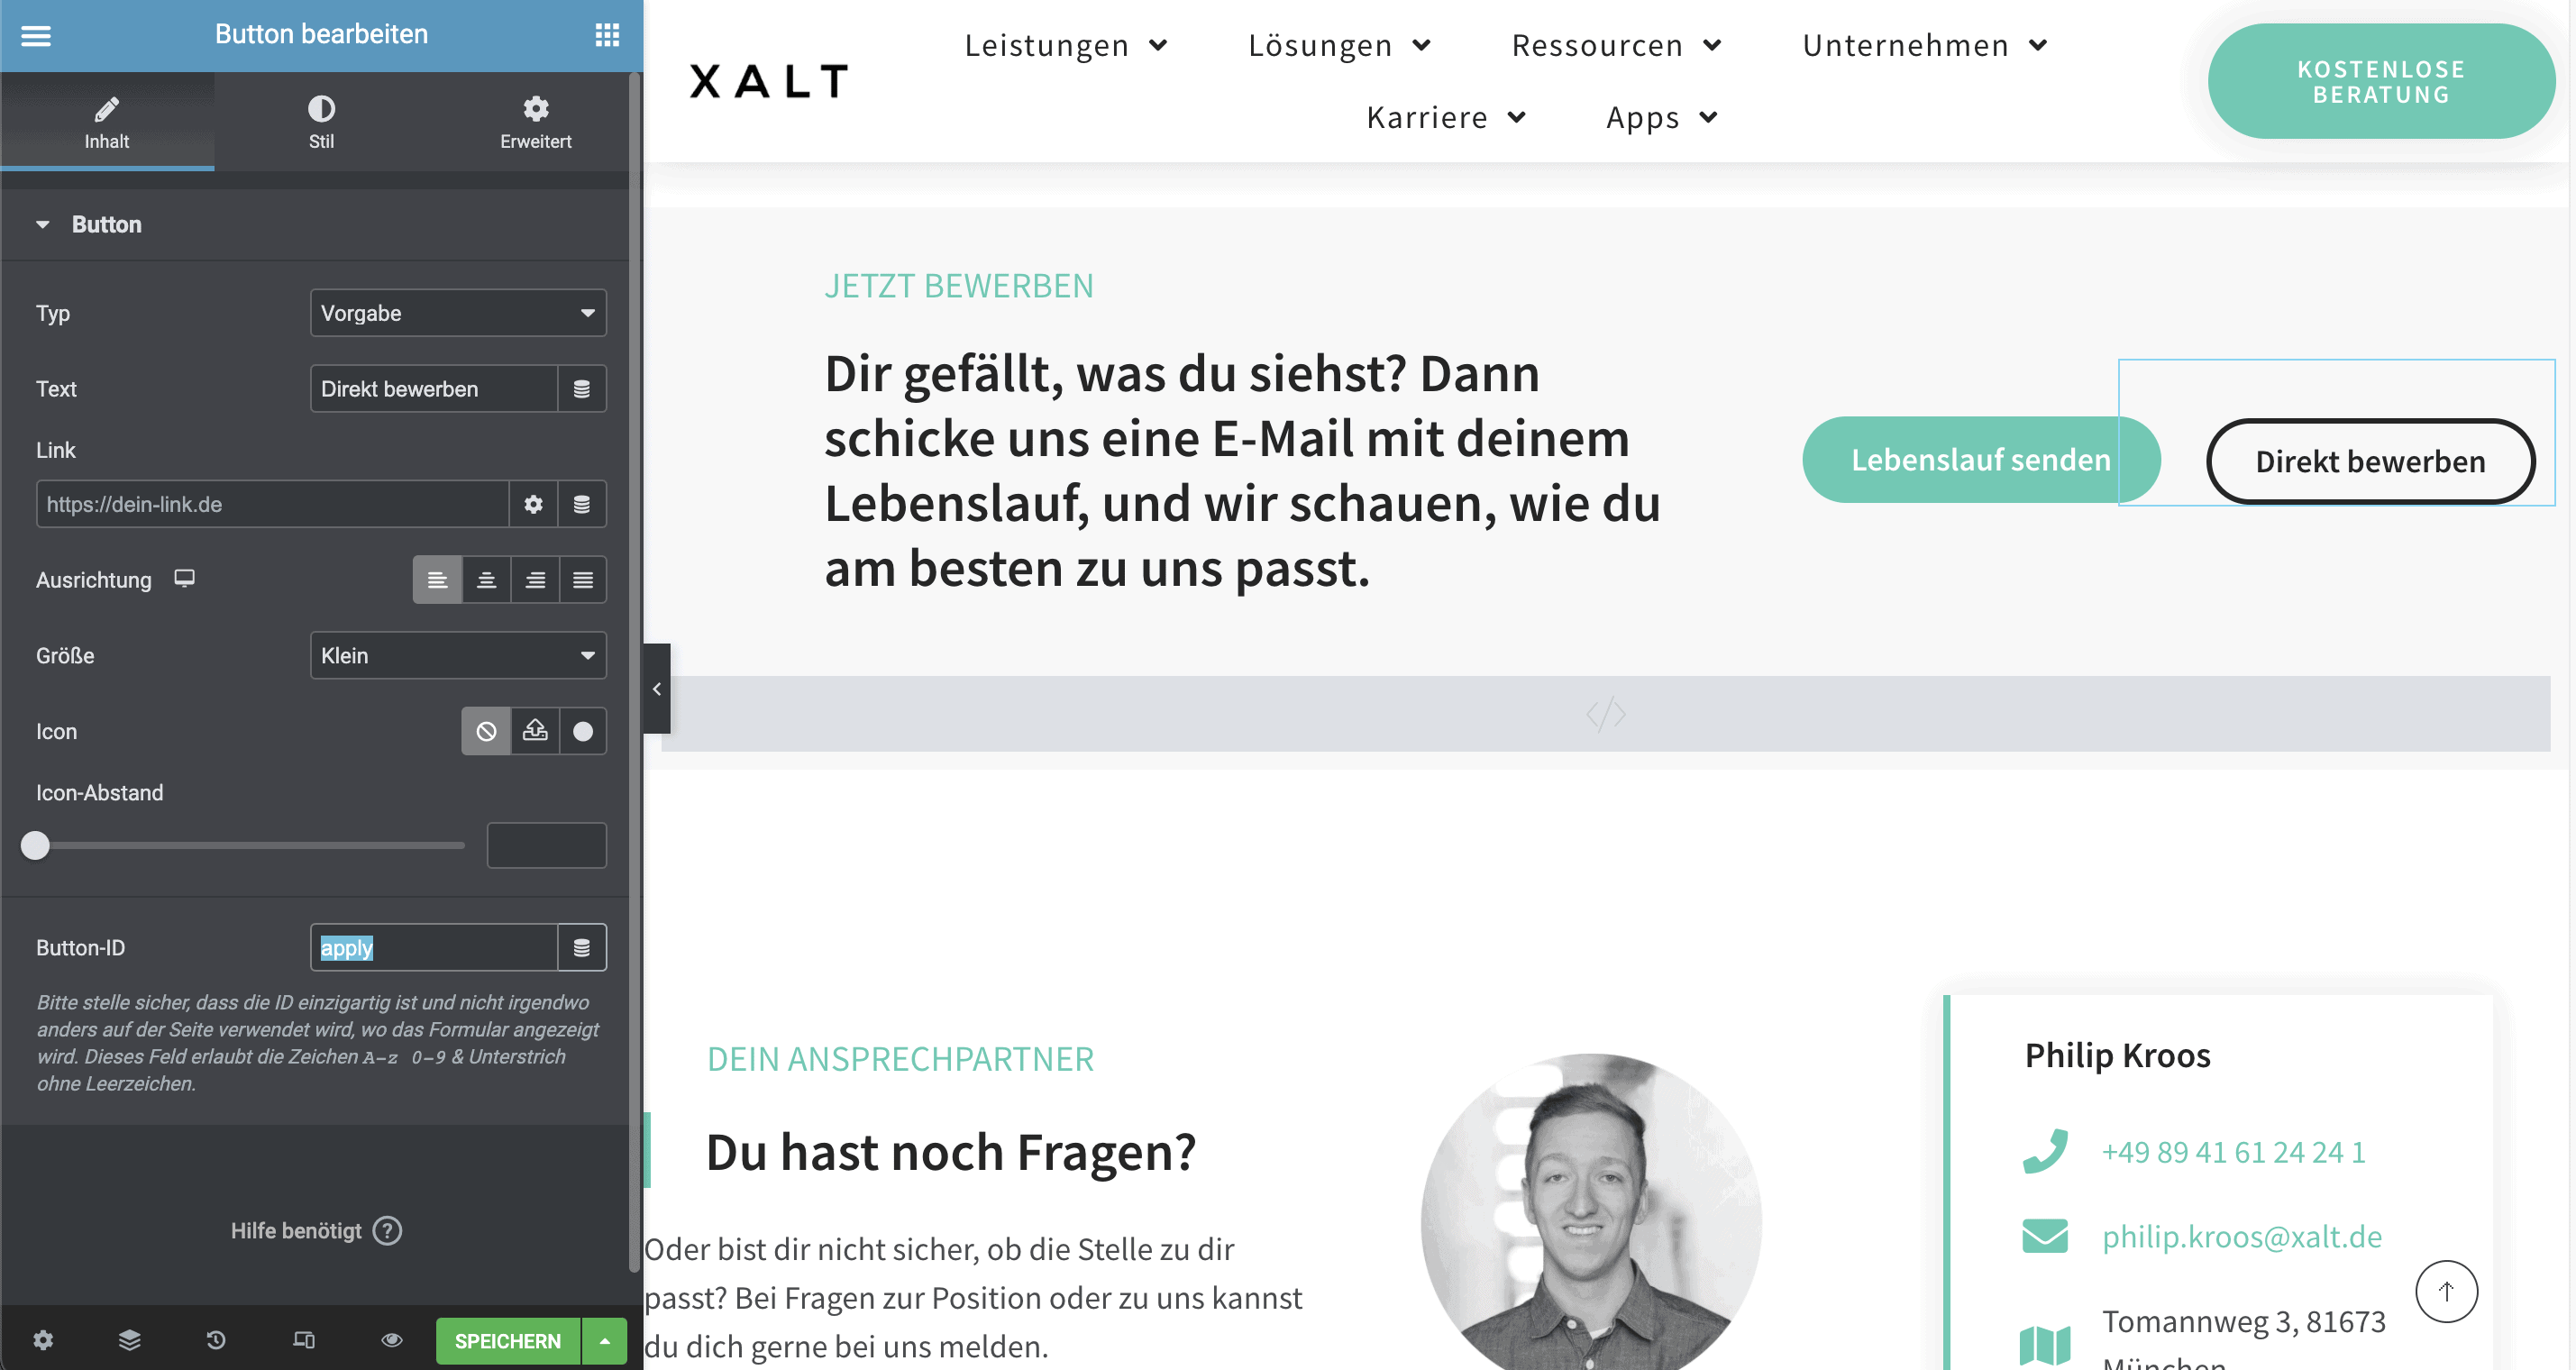
For our job posts we use WordPress Elementorbut you can use any website builder as long as you can edit the HTML code of the page. If you do not have access, it is best to ask the people who manage your website for help.
First, give the button an ID, for example "apply" like in the screenshot.
WordPress button
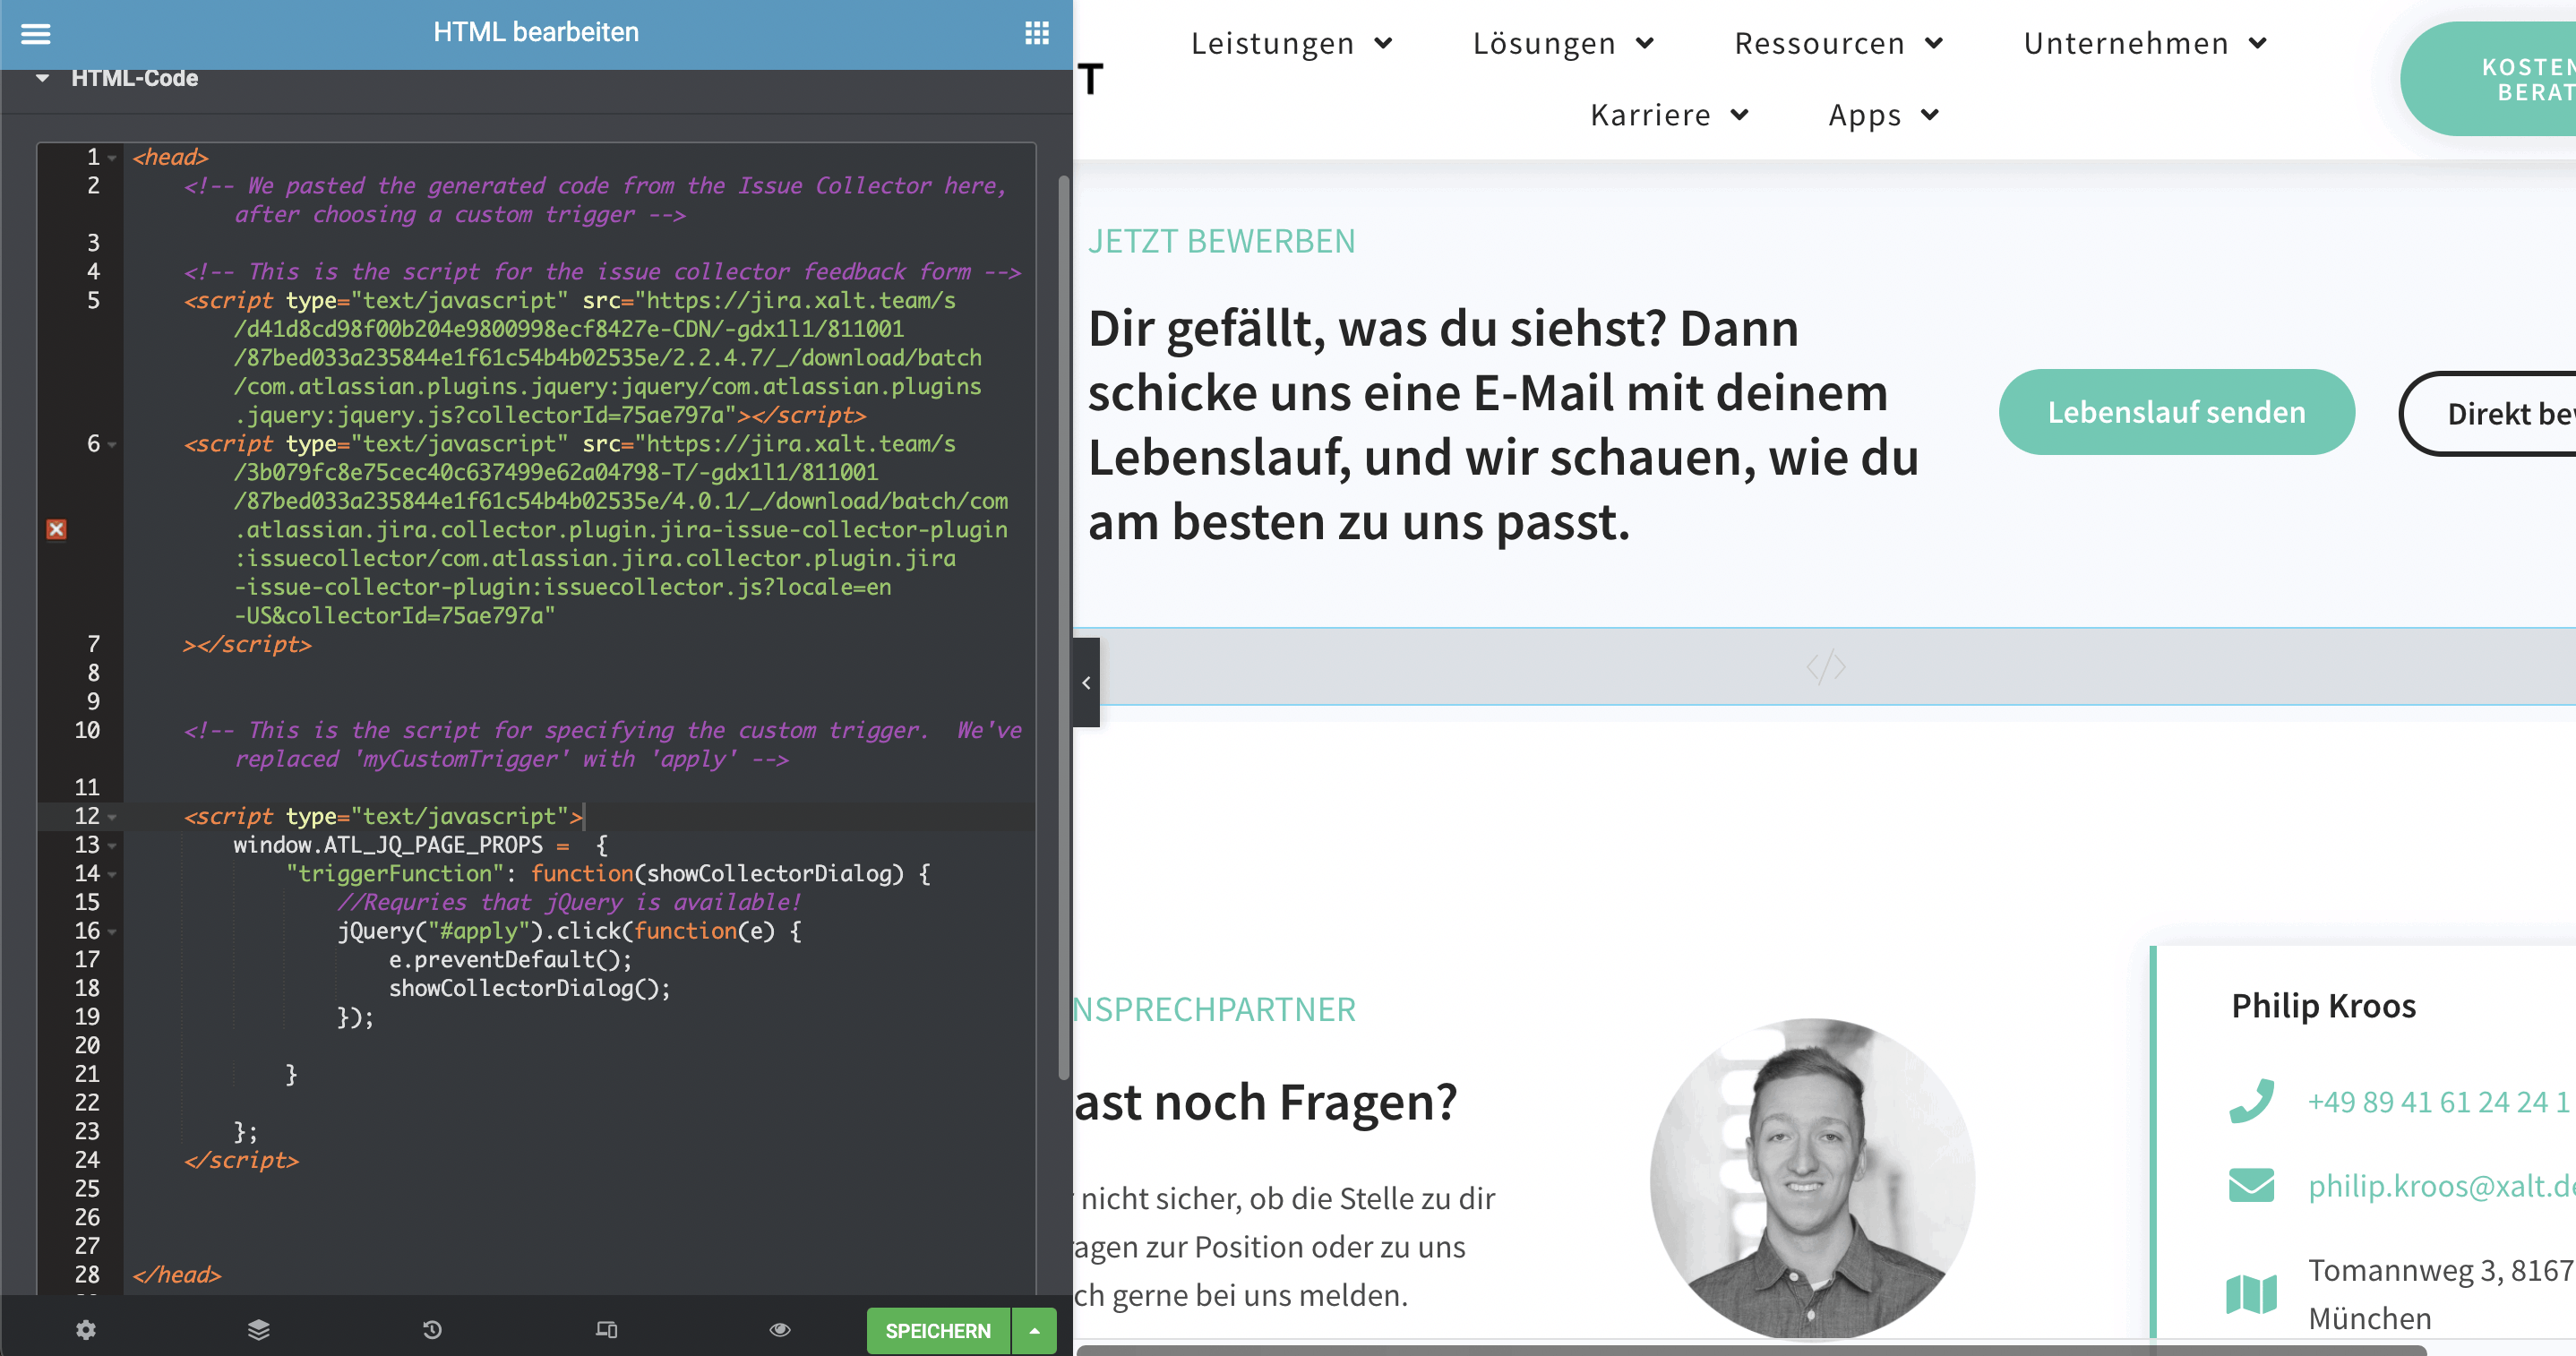
Then add a custom HTML widget to the page in which the previously copied HTML code from Jira is pasted.
HTML Widget Configuration in WordPress
Search the code for "#myCustomTrigger" and replace this with the button ID, in this case "#apply".
Once the code is embedded, click "save" and the Issue Collector is ready to go
Step Five: Testing
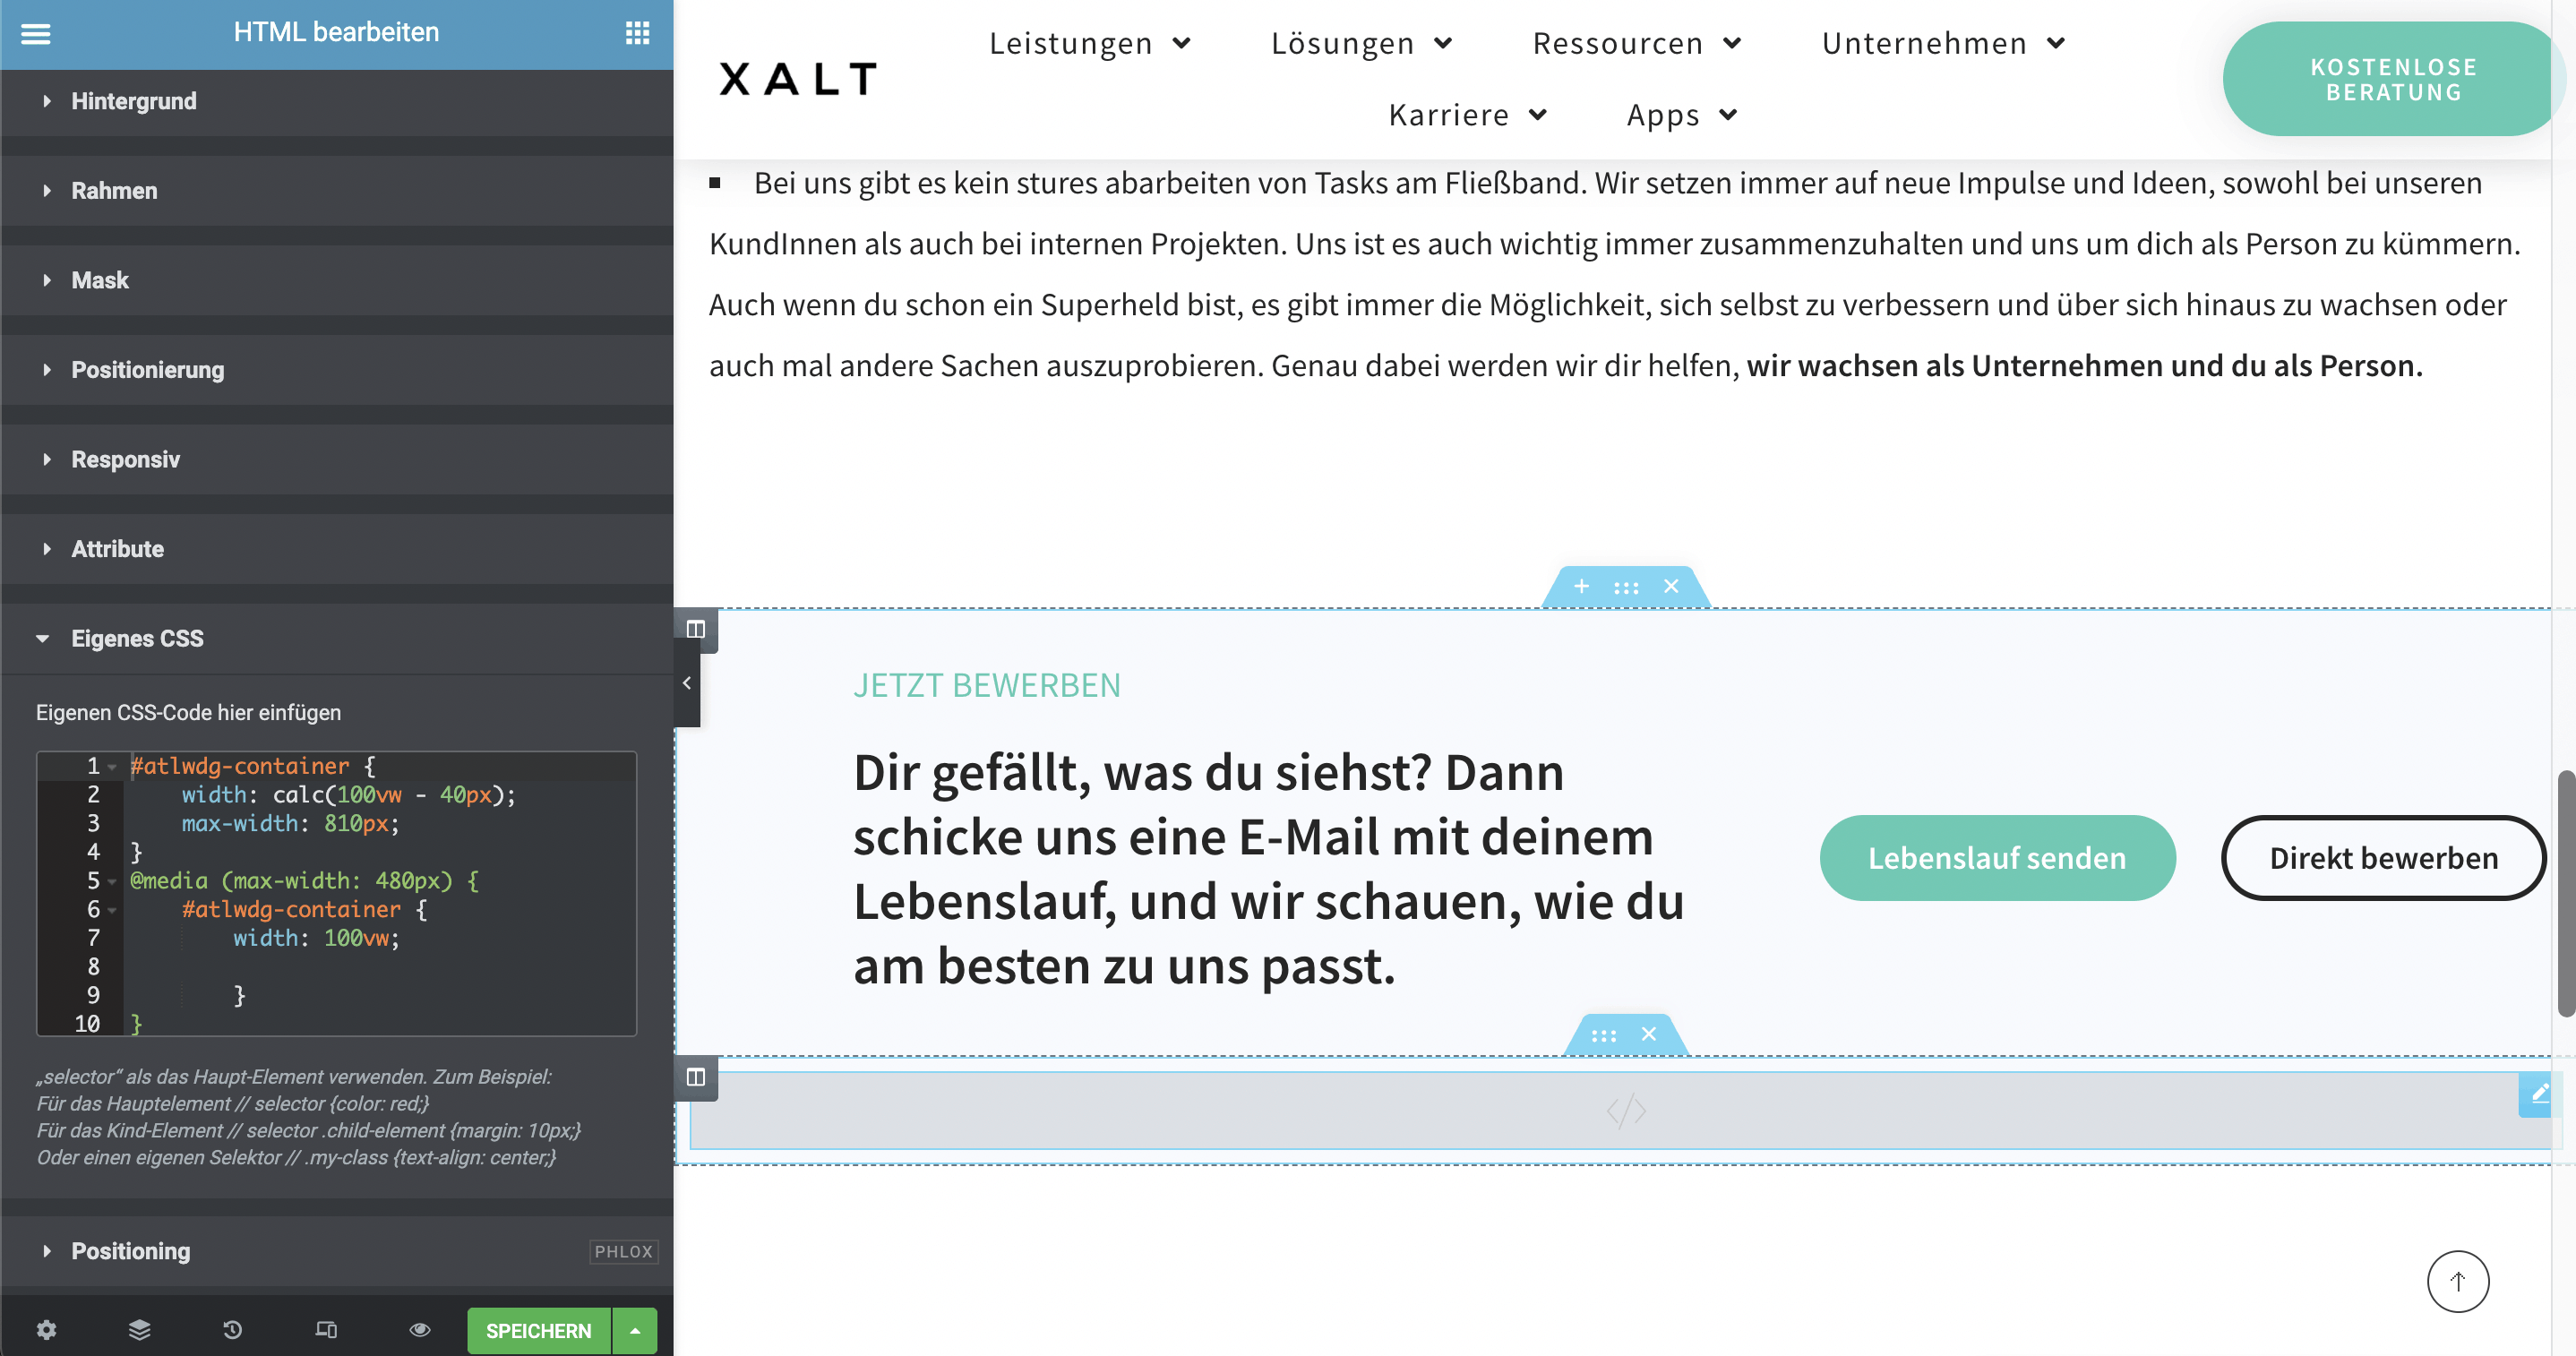
The issue collector is now embedded and can be opened by clicking on the call to action "Apply directly". To support the display for mobile devices, only one more small adjustment needs to be made.
To do this, switch from the "Content" window of the HTML widget to "Advanced" and navigate to the "Custom CSS" field.
Linking the button to the pop-up modal in Elementor
Add the following code as shown in the screenshot, so that the issue collector window scales correctly on mobile devices as well
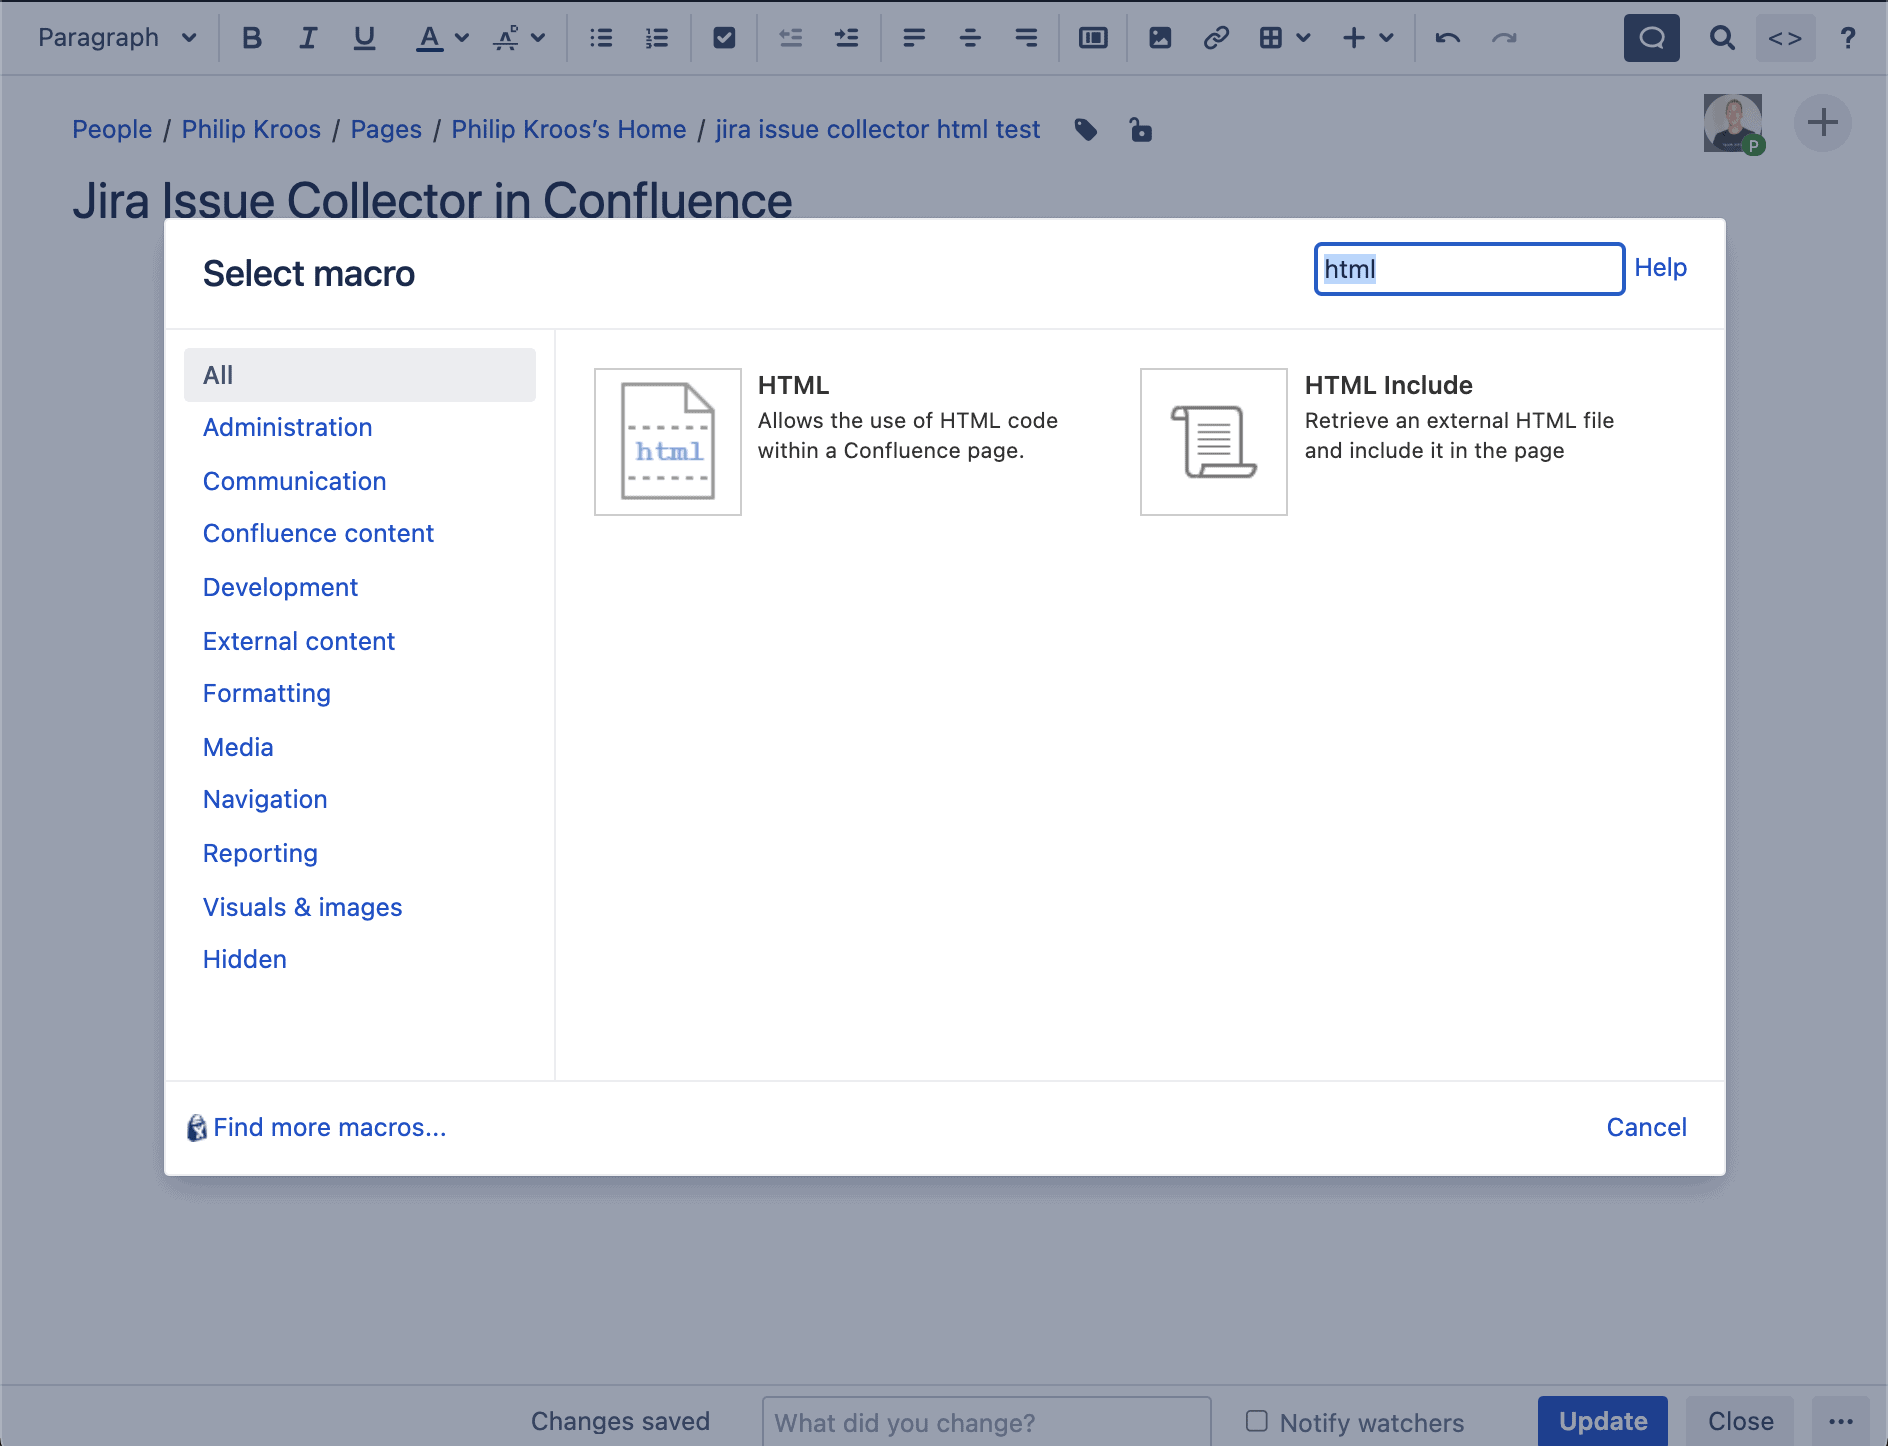
After the Confluence page is updated, the following button appears, which opens the issue collector after a click. This way, a Jira ticket can be created directly in a Confluence page immediately and without detours.
Summary & Outlook
Done! Now the application form is embedded in the form of a Jira issue collector on your website or Confluence and applicants can apply immediately with a Jira ticket. Of course, it is possible to use an issue collector for other purposes than applications. You could also add a button to certain Confluence pages or templates to create Jira tickets directly in meeting notes. Or you could add an issue collector to Confluence pages that you use for onboarding new team members, so they can easily give feedback or create support tickets.
If you'd like to learn more about using Jira and Confluence to set up HR and Recruiting processes in an organization, feel free to check out our blog post.
If you need more detailed information, we would be happy to talk to you at any time, completely free of charge and without obligation. As an Atlassian Gold Solution Partner, we are also happy to advise you on further solutions. On our Atlassian Services page you can learn more about our approach and methodology.
Recruiting with Jira Service Management - Without external tools
Manage your applications directly in Jira. Automate and digitize your recruitment process.
Detailed reporting has always been part of any professional workflow. And so it is also easy to create detailed reports in Jira Service Management. These enable your team to continuously evolve.
With the help of the fully integrated and native reporting function, you can constantly evaluate the performance of your team. And then you can analyze where a bottleneck exists. And all this without having to manually intervene at any point.
Native Reporting - Made Easy
Jira Service Management comes with some predefined reports and creates them completely automatically by default. The following reports are already predefined:
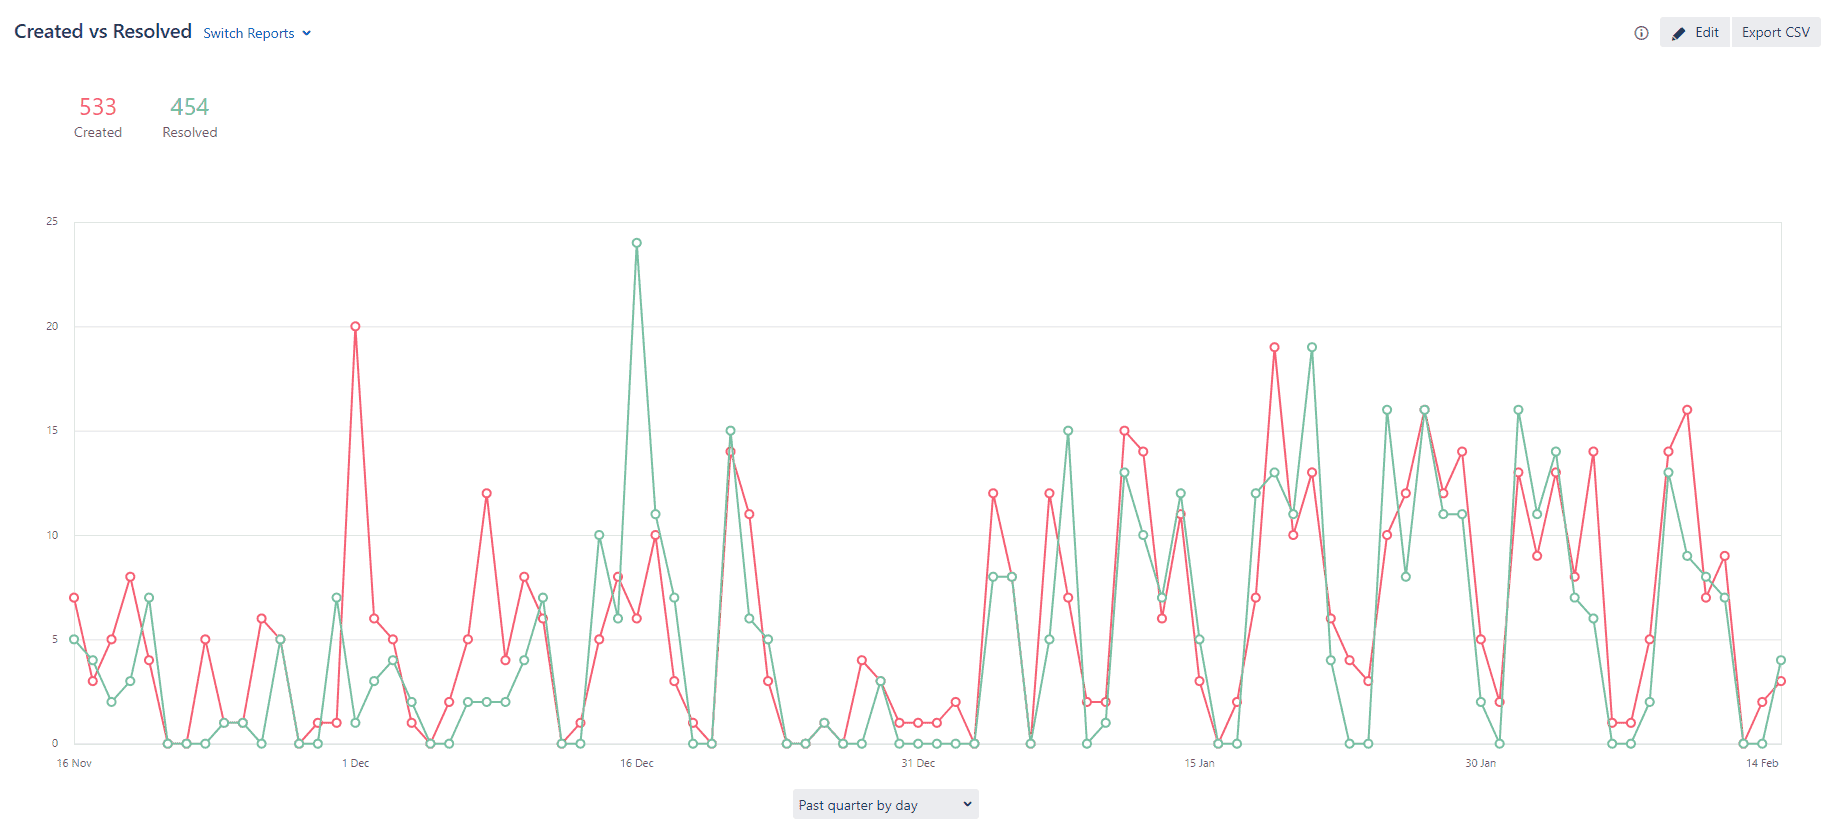
Performance Report - Created vs. Solved Operations: Find out how effectively your team is working or at what point a bottleneck effect occurs.
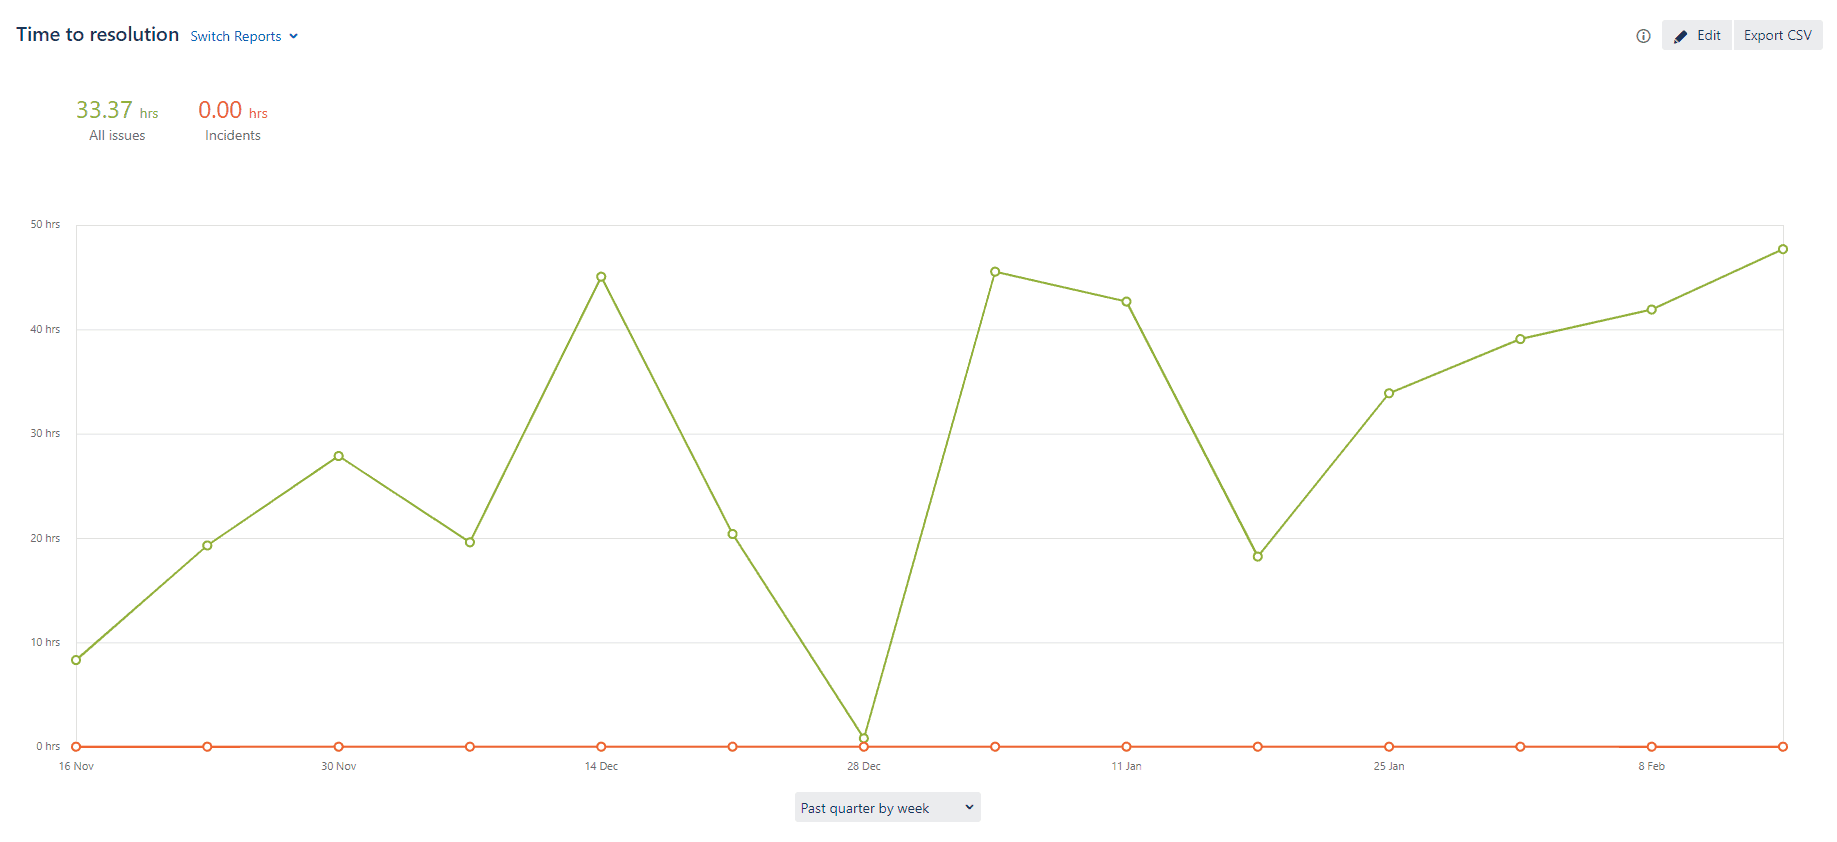
Elapsed time to resolution: Can your team handle enough tickets in a given time frame?
Time to first reaction: How long does a ticket remain unprocessed in the system?
Waiting time for support: How long does a ticket creator have to wait for support?
Requests by priority: Which priority is most common?
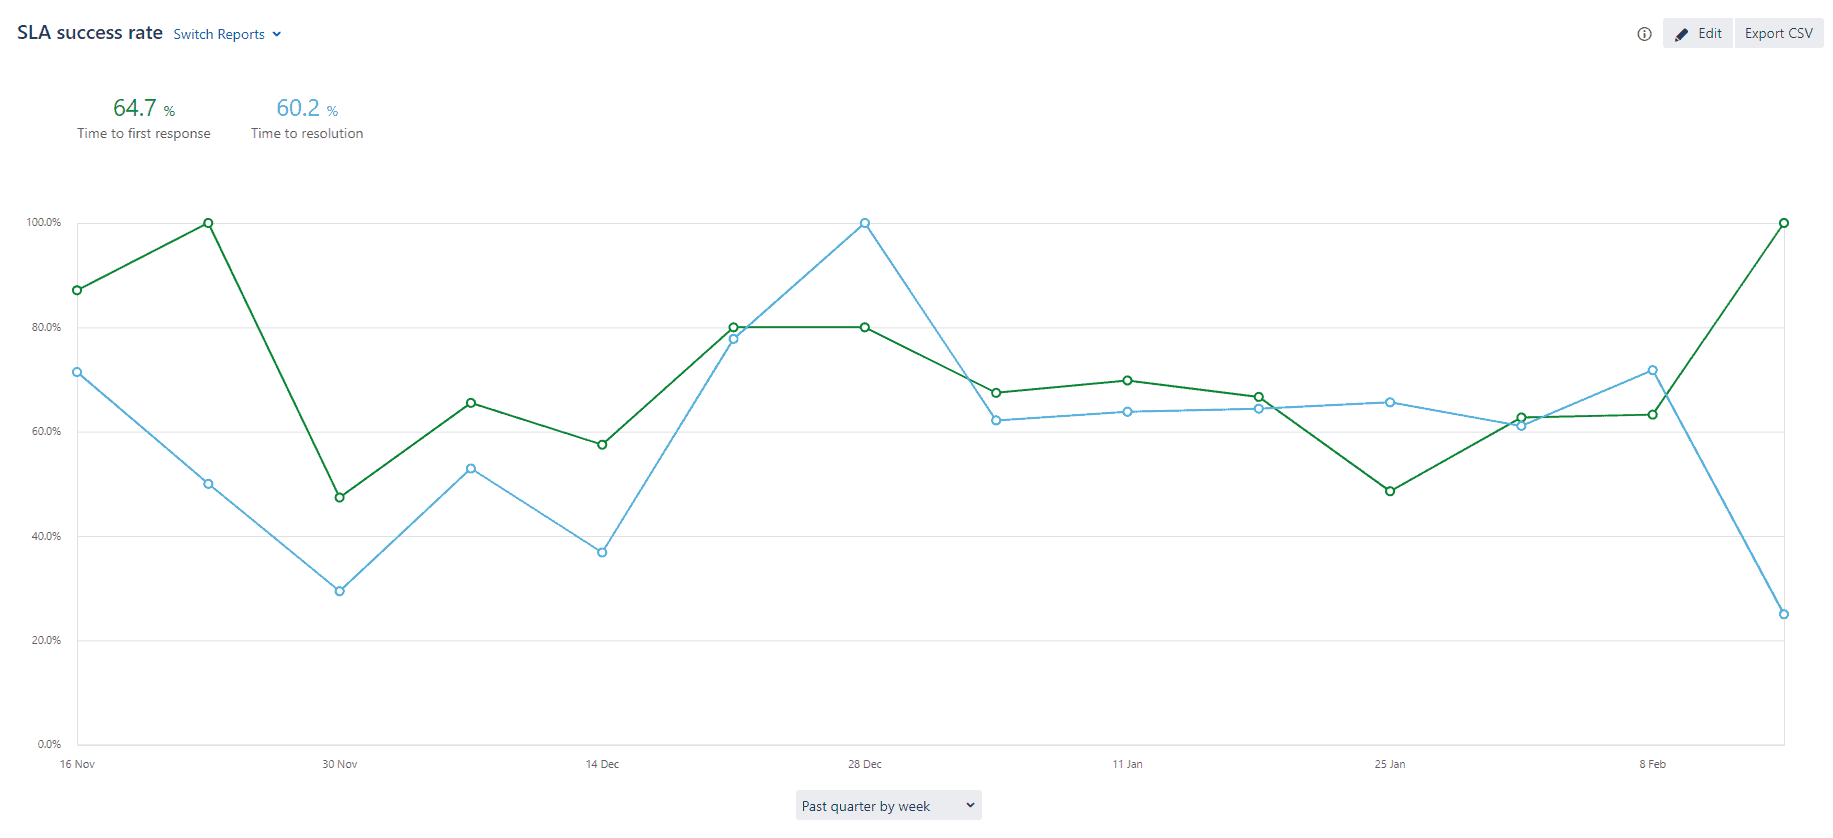
Service Level Agreement (SLA) ReportsHow good is my customer service really? Here you can find out whether your customer service has really achieved the goals you set. And at which point the performance was ultimately insufficient. Possible SLA reports are:
Time to solution
Waiting time until the first support
Time until the first answer
Jira Service Management offers the additional advantage that all reports can be customized at any time. And you can also create fully personalized reports.
You can release "read-only" reports to your team. This creates the necessary transparency towards the defined performance indicators (KPIs) and tells your team exactly what data is being collected.
Performance, visibility and tracking
With Jira Service Management, the Customer Service and Support teams can easily track their performance and have visibility into reports at any time. As mentioned earlier, you can create real-time reports. These provide both the team and the management with insight into the workflow. This makes it easy to evaluate where improvements can be made or if additional manpower is needed. You are always able to track all relevant KPIs. And you can find out where you or your team can improve further.
Example Reports in Jira Service Management
Performance Report: Created vs. Solved Operations
This report gives you an initial overview of the number of requests created compared to the number of requests resolved. This way you can immediately see if, for example, an update of your IT system has led to an increase in requests. Or if less requests could be solved due to an employee's absence. Furthermore, it can also be determined whether the processing time of individual requests could be reduced through the introduction of a new process.
Requests by priority
With this standard report, it is easy for you to find out which request priority is most frequently selected by Jira Service Management users. With Jira Service Management, you can easily get an overview of which JIRA issue types are being handled by your customer support team.
Jira Query Language (JQL) Reports
In addition to the predefined reports, you can also filter JIRA issues with JQL. This means that by highlighting the responsiveness of certain issue types, you can see, for example, how quickly a blocker or a high-priority ticket is answered compared to other issues.
Your teams can use it to break down data further and refine reports, for example, to highlight specific issues and make them clearer. With these insights, you can proactively answer knowledge base articles down the road. And provide your users with articles in advance in the help desk for self-service. This way, certain support requests can already be answered and solved without a ticket.
12-Month Report Archive
Jira Service Management stores reports for 12 months and allows you and your team to assess which KPIs or target values are relevant to your business. service level agreements should be defined. This makes it easy for you to set realistic targets for the customer and support team and to visualize the workload and performance.
XALT as Atlassian Gold Partner
As an Atlassian Gold Partner for Jira and Confluence, we are happy to support you with all questions and solutions related to the introduction and use of Atlassian solutions. This also includes the introduction of Jira Service Management in your company. We advise you in all questions from planning and configuration to licensing and implementation of Atlassian solutions. You can find more information about our services on our information page about our Atlassian solutions. Atlassian Services.
Shopping cart
B/S/H
BSH Hausgeräte GmbH is the largest manufacturer of household appliances in Europe and one of the world's leading companies in this sector.
Projects & Solutions
Projects
Success Stories
Technologies
Projects
Sed ut perspiciatis unde omnis iste natus error sit voluptatem accusantium doloremque laudantium, totam rem aperiam.
Eaque ipsa quae ab illo inventore veritatis et quasi architecto beatae vitae dicta sunt explicabo.
Nemo enim ipsam voluptatem quia voluptas sit aspernatur aut odit aut fugit.
Sed quia consequuntur magni dolores eos qui ratione voluptatem sequi nesciunt.
Success Stories
Lorem ipsum dolor sit amet, consectetur adipiscing elit. Ut elit tellus, luctus nec ullamcorper mattis, pulvinar dapibus leo.
Technologies
Lorem ipsum dolor sit amet, consectetur adipiscing elit. Ut elit tellus, luctus nec ullamcorper mattis, pulvinar dapibus leo.