
Jira Service Management (also known as Jira Service Desk) is one of the most comprehensive and widely used ITSM tools. Whether it is internal requests to IT departments or external support requests – with Jira Service Management (JSM), not only is your team involved immediately and directly. But the requesting persons also receive immediate feedback. These requests are usually created with the Issue Collector and are mostly found on Service Desk pages.
The classic application area of JSM is IT departments in companies, for example, when employees discover a software bug, they can create a ticket directly via JSM, which can then be processed by their IT or development team. Working with Jira tickets is an essential building block of successful, agile ways of working and is now indispensable in many modern tech companies.
But not only tech companies can use JSM for their processes and workflows and do not have to limit themselves to IT requests. Jira Service Management offers almost endless possibilities to accelerate your company. In our blog post Fast and efficient recruitment processes with Jira we introduced our solution on how to use JSM for applicant management. In this second part, we show how you can not only receive applications via an email inbox linked to a Jira project and convert them into Jira tickets, but with the Issue Collector.
What is an Issue Collector?
With an Issue Collector, a Jira feedback form can be embedded on your own websites. By clicking on the corresponding trigger – which must be defined – this form can be opened and, after filling it out, a Jira ticket (or issue) can be conveniently created. The fields of the form can be individually adapted to query essential information, e.g. the cover letter as a text field, the email for notifications and communication, file attachments for CVs, references, etc.
Why does an Issue Collector make sense?
As explained in the first part of the blog series, a simple email inbox can be set up and linked to your Jira project. All emails that arrive in the inbox automatically create a Jira issue, containing all information and attachments from the email. However, it may be that the email inbox receives not only relevant emails or applications, but also requests from external headhunters or marketing emails. These are also created as issues in the JSM project and must be filtered out.
In addition, it may be that you want to invite your applicants to apply directly on the homepage and do not want to use a cumbersome job portal or the route via email. With an Issue Collector via button click, the web layout is not disturbed and applicants are not redirected to other pages.
Best take a look directly at xalt.de/jobs. In our job posts, it quickly becomes clear what we are talking about. Simply scroll down on this page until the "Apply directly" button is visible and click on it. Don't worry, an application will not be sent to us immediately. Subsequently, a popup opens, which contains the Issue Collector of Jira Service Management.
And how do you set up the Issue Collector?
Step 1: Creation
- Select the Jira project for which tickets are to be created via the Issue Collector.
- Navigate to the project settings and scroll down until the "Issue Collector" field is visible:
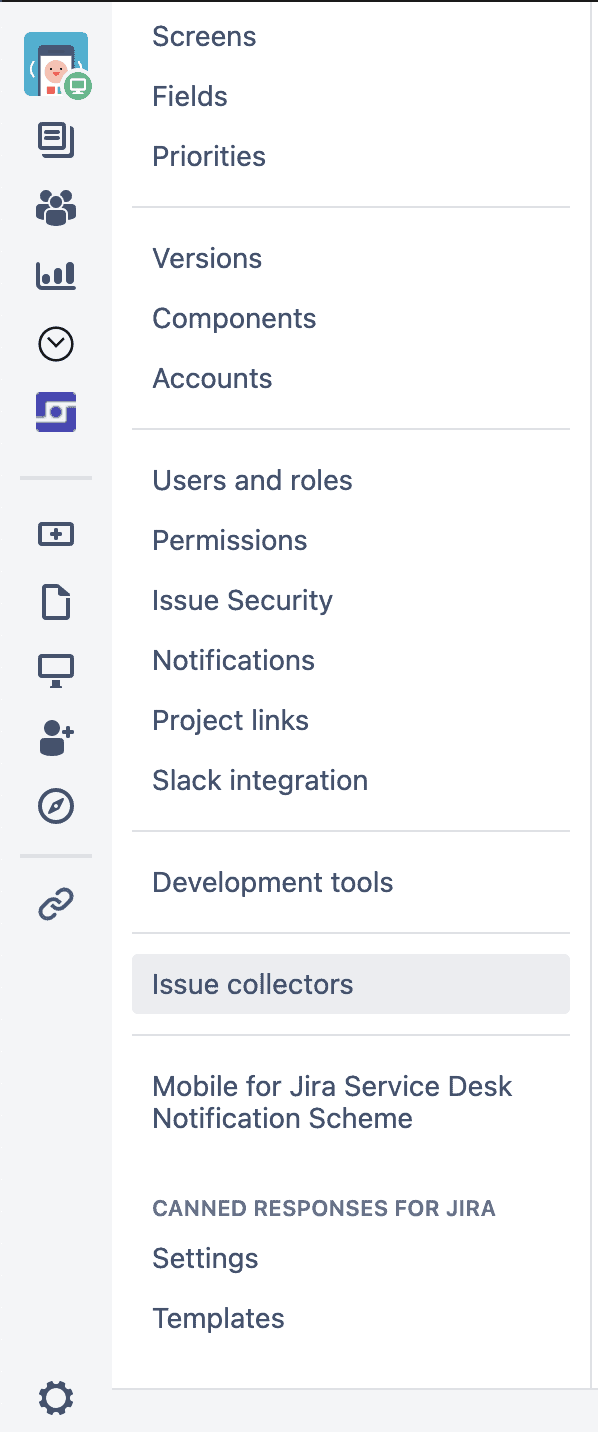
- Once there, create a new Issue Collector.
Step 2: Setup
- In the next window, you can add and configure the name and description of the Issue Collector, as well as set who should be the default reporter. In this case, the option "Attempt to match submitter email address" can be selected; if the email address provided in the Issue Collector matches a user in your Jira instance, that person will automatically be set as the "Reporter" of the ticket.
- If external users (e.g., applicants) are to be automatically recorded as the reporter of the created ticket, Groovy scripts and post-functions must be created, which will be explained in more detail in a future blog post. If you need this feature now, please contact us and we will be happy to help.
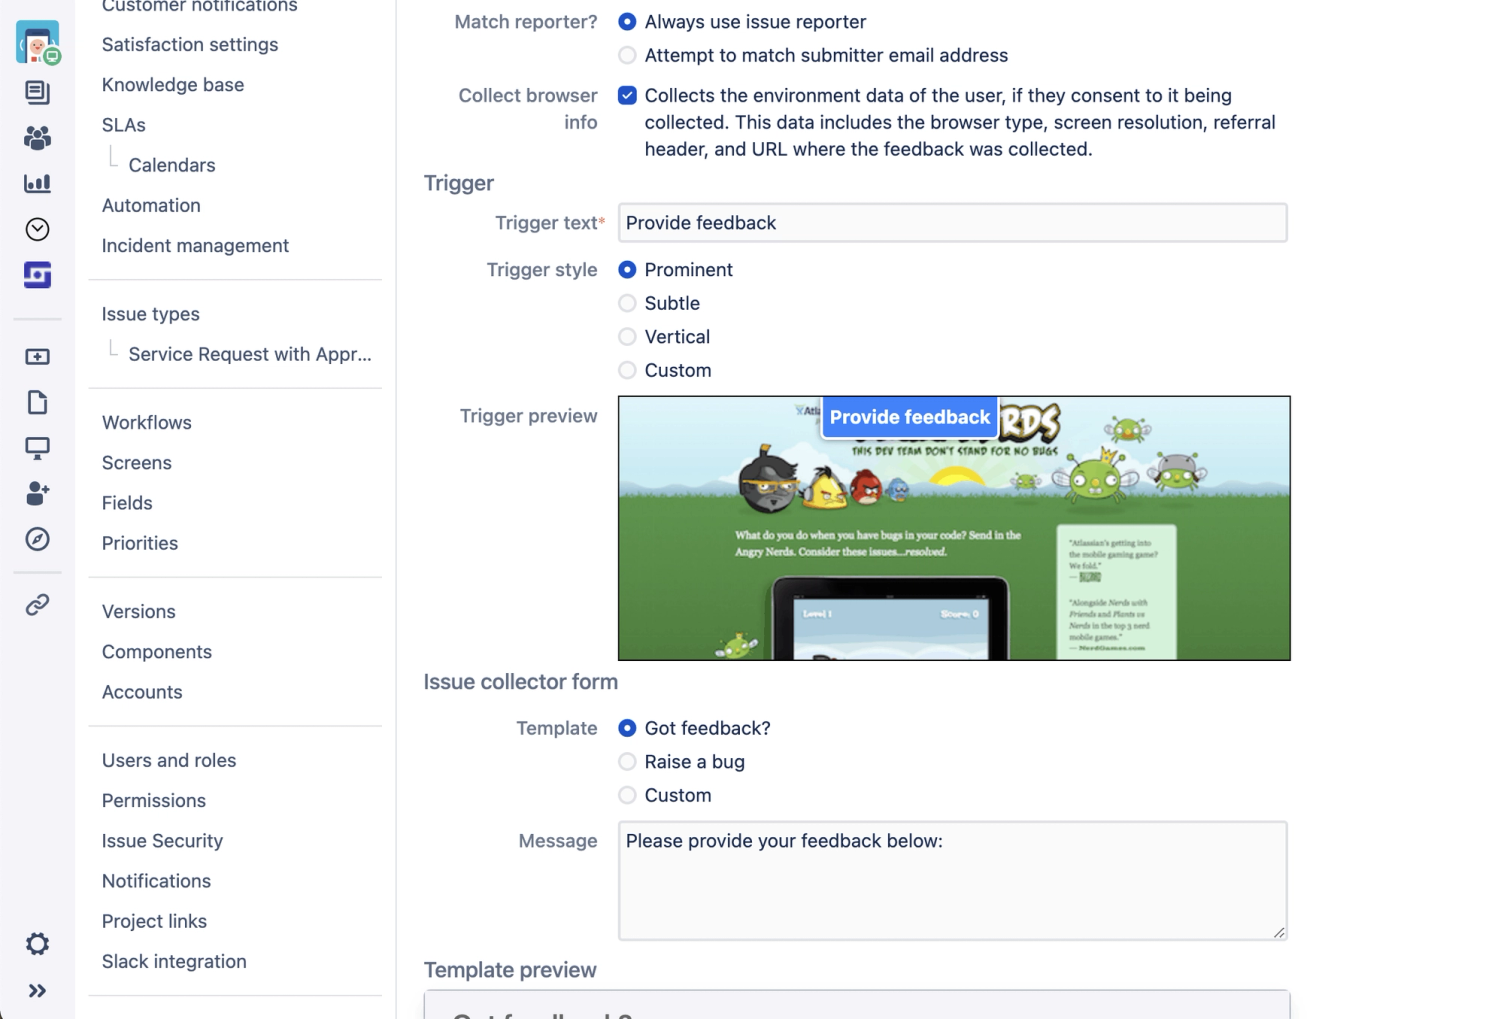
- Back to the Issue Collector: In this window, the trigger can be defined and a preview of the form can be viewed.
- To do this, first click on "Custom trigger".
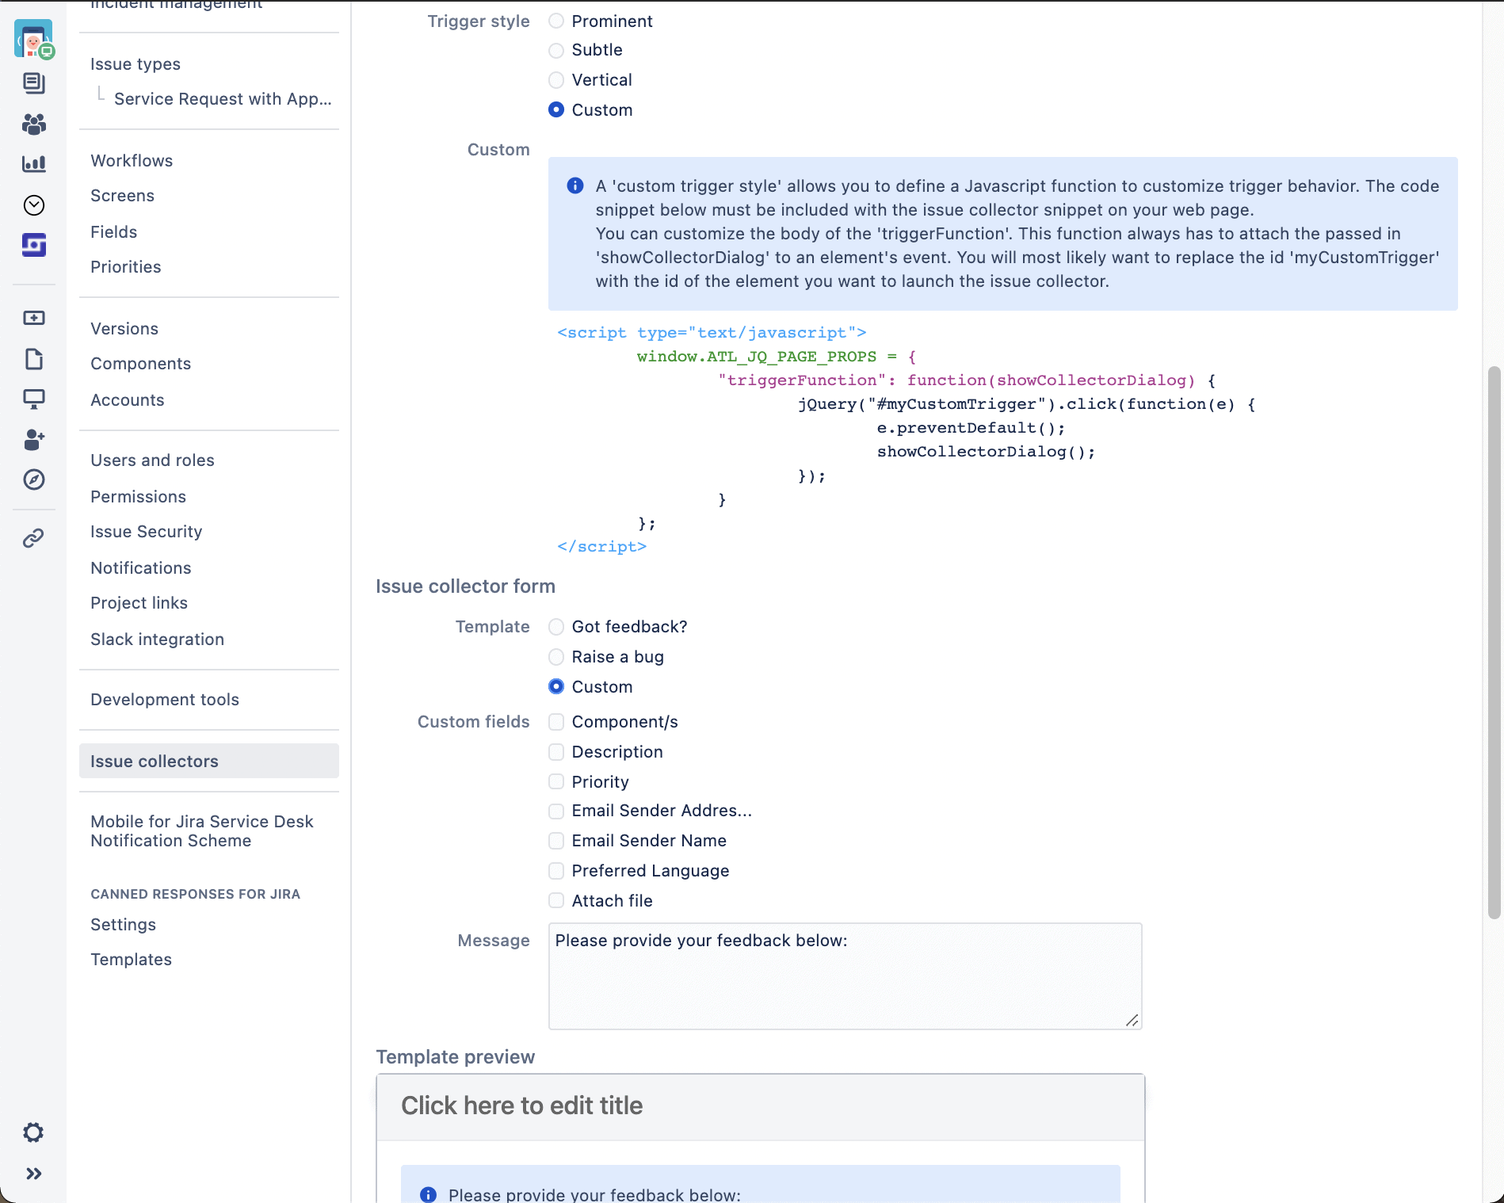
- Now click on "Custom" under "Issue collector form". Here, the fields of the application form can now be determined.
- For our example, we opted for a simple application form. The "Position" field is the title of the created ticket, so that our HR managers immediately know which position the application is for.
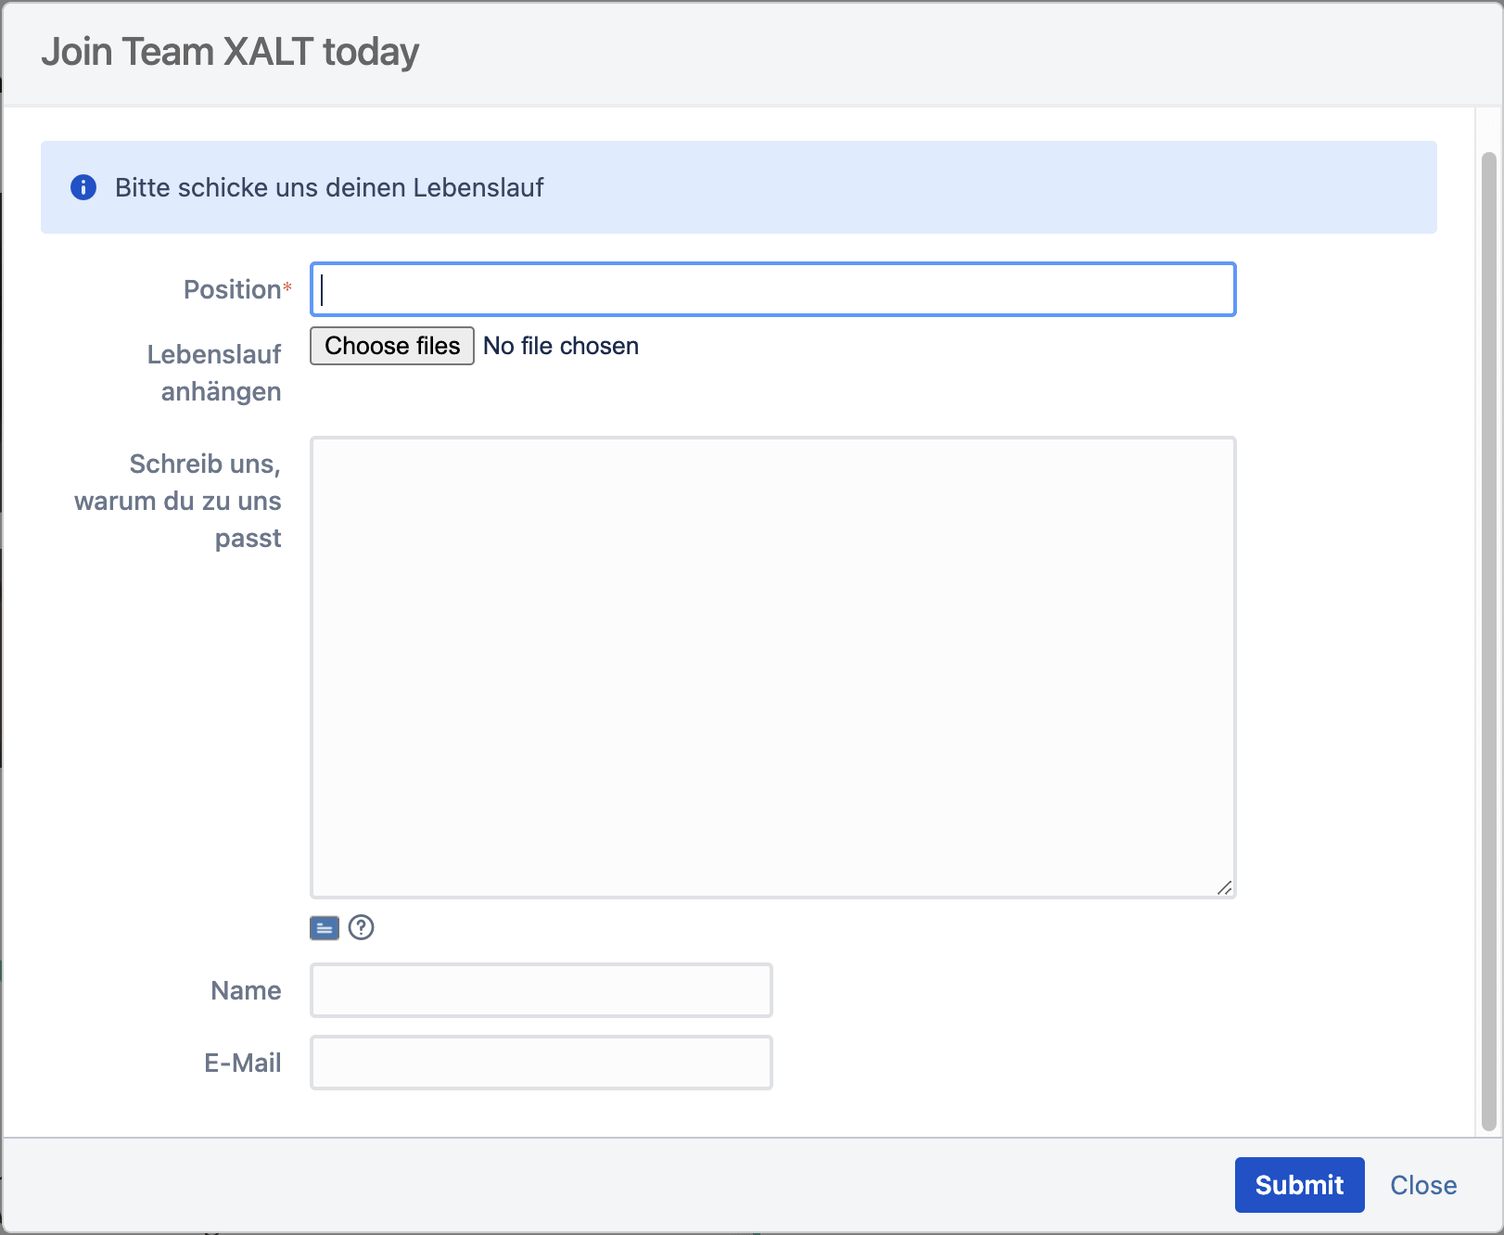
- When you are done, save the Issue Collector and you will proceed to the next window.
Recruiting with Jira Service Management – no external tools
How to integrate the Issue Collector into websites (HTML or Javascript)?
Step 3: HTML snippet
- On this page, you will receive the HTML snippet or Javascript required for embedding. It is best to copy the code to the clipboard or into a text editor.
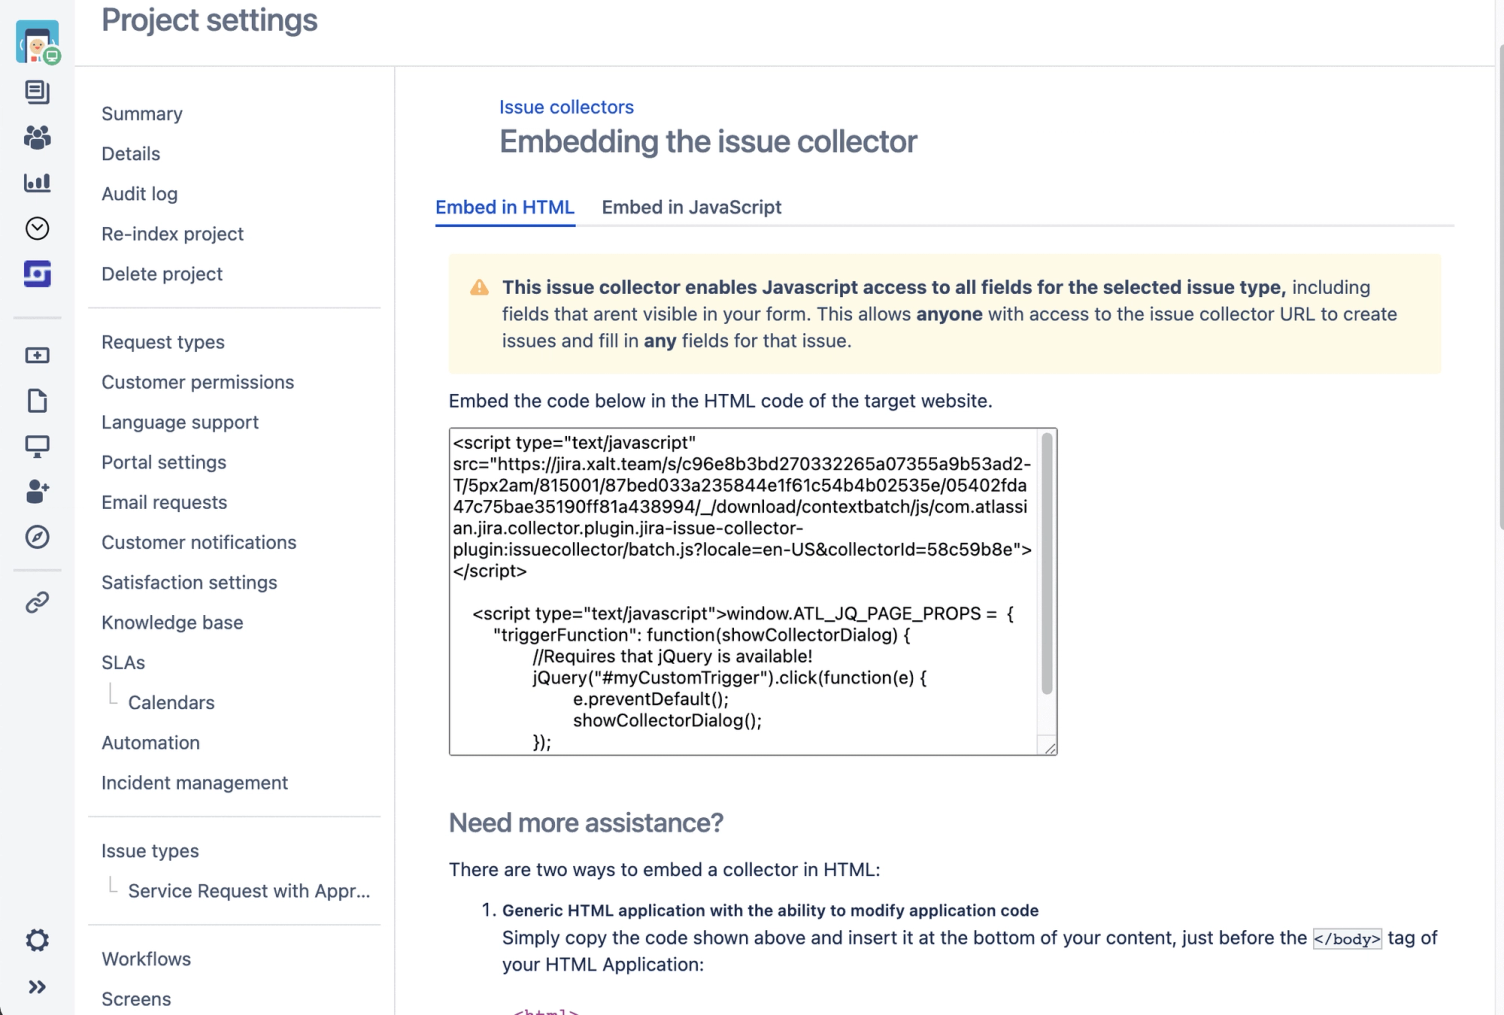
- Next, the custom trigger must be defined, i.e., how the Issue Collector can be opened by applicants. We opted for a simple call-to-action button, but any element on a website can be set as a trigger, e.g., images or similar.
Step 4: Embed on the website
- For our job posts, we use Wordpress Elementor, but you can use any website builder as long as you can edit the page's HTML code. If you don't have access, it is best to ask the people who manage your website.
- First, give the button an ID, for example "apply" as shown in the screenshot.
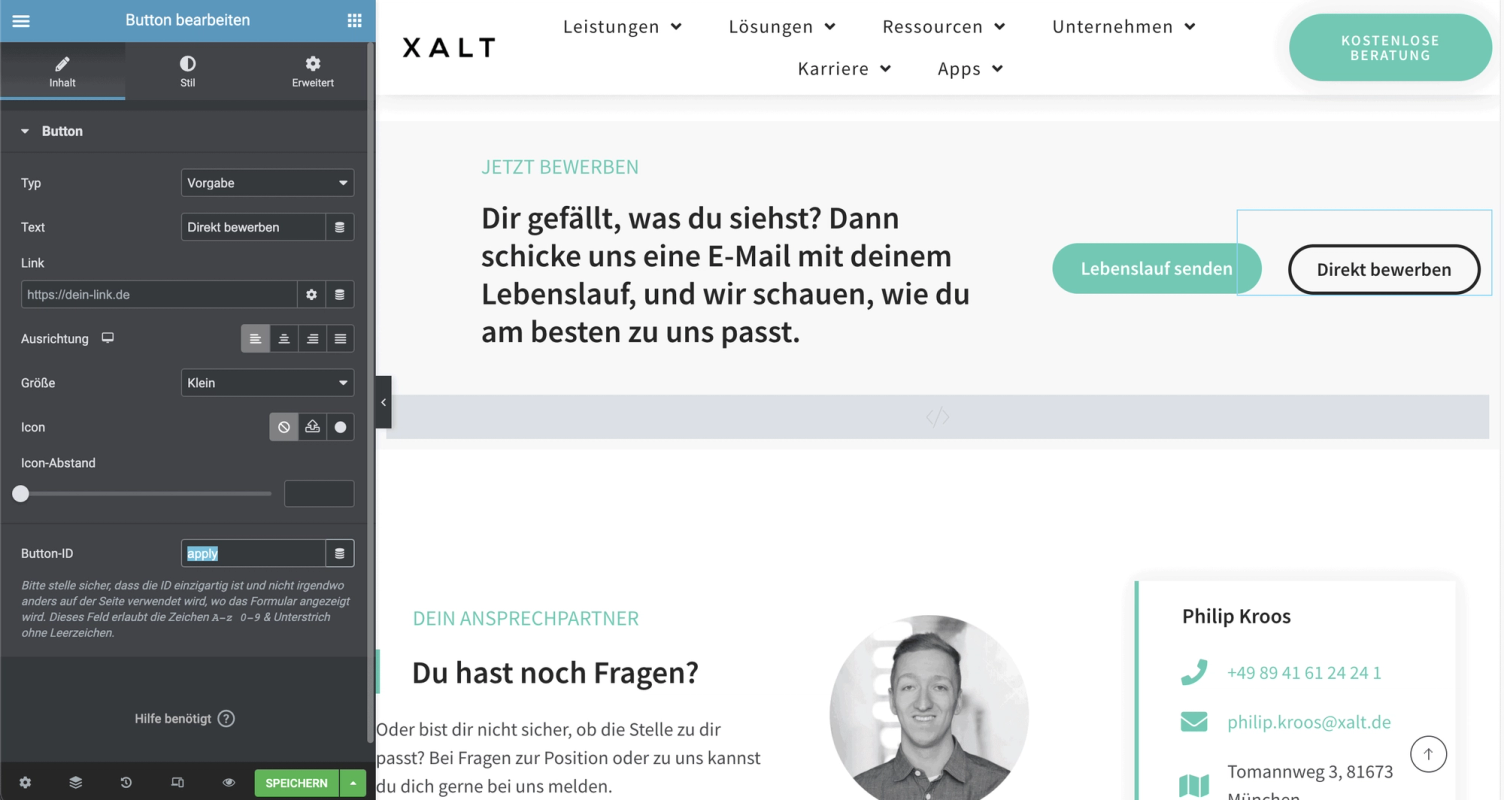
- Then, add a custom HTML widget to the page into which you insert the HTML code you previously copied from Jira.
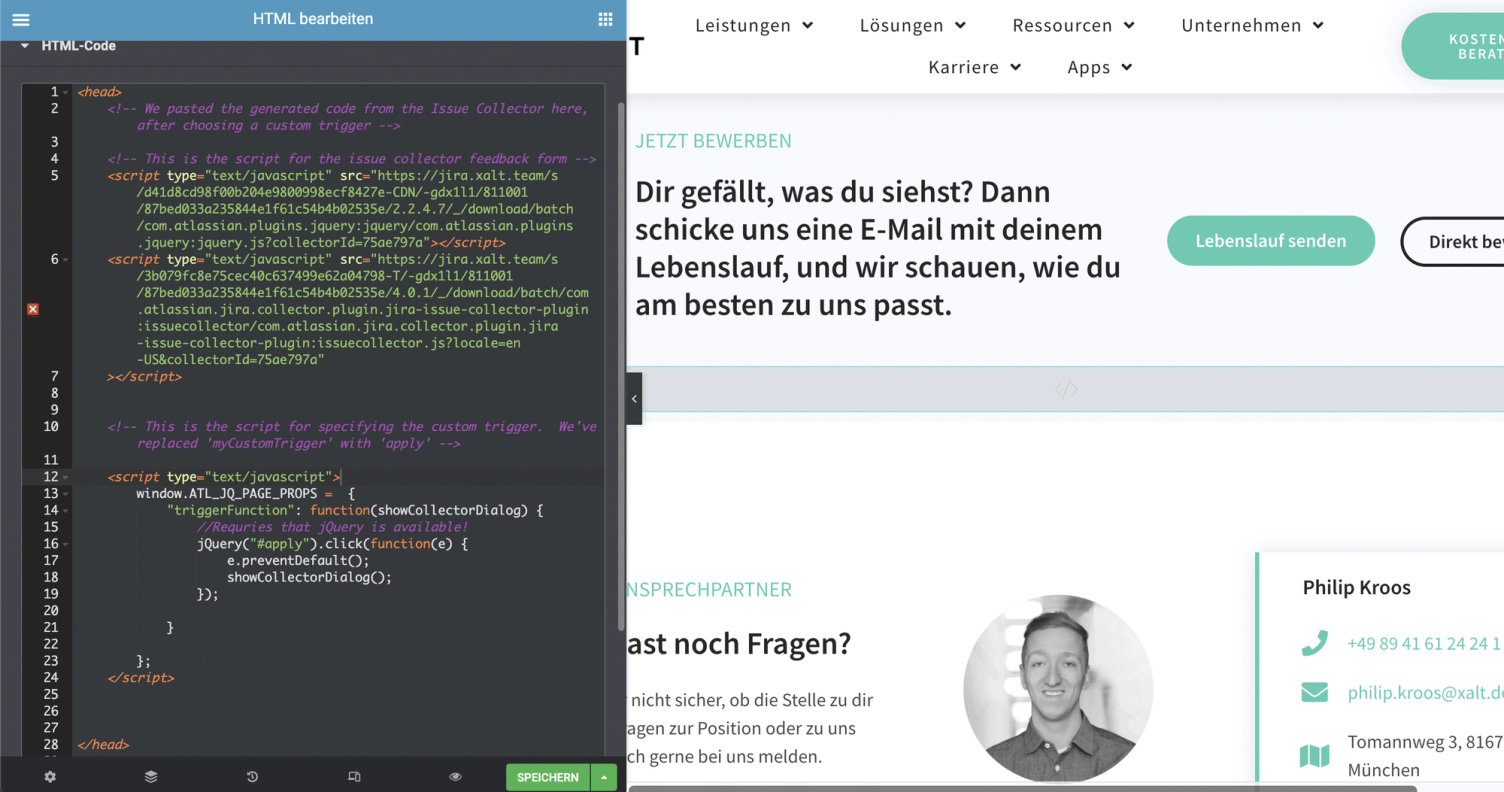
- Search for "#myCustomTrigger" in the code and replace it with the button ID, in this case "#apply".
- Once the code is embedded, click "save" and the Issue Collector is ready.
Step 5: Testing
- The Issue Collector is now embedded and can be opened by clicking the call to action "Apply directly". To support the display on mobile devices, only a small adjustment needs to be made.
- To do this, switch from the "Content" window of the HTML widget to "Advanced" and navigate to the "Custom CSS" field.
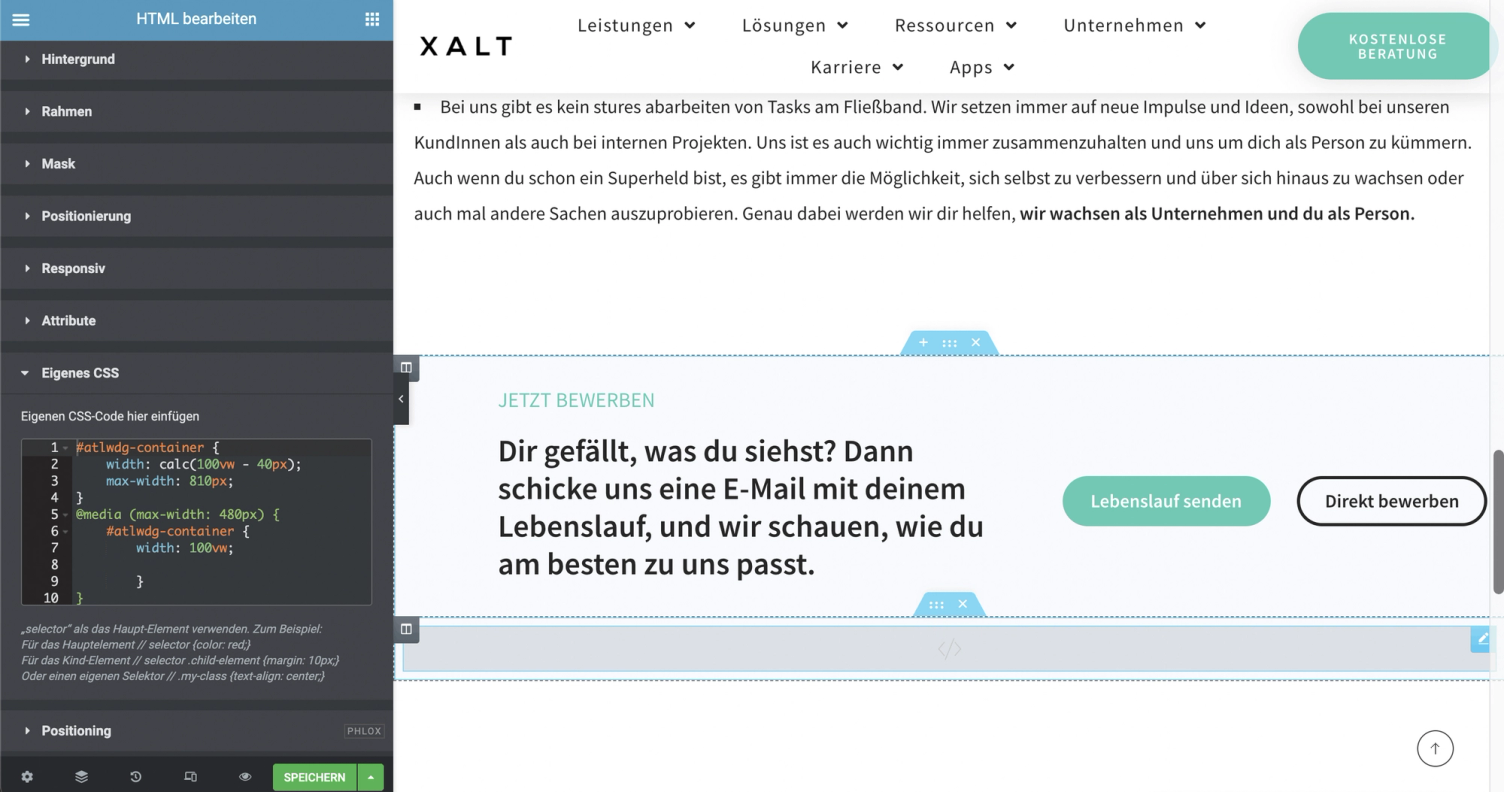
- Insert the following code as shown in the screenshot so that the issue collector window scales correctly on mobile devices.
#atlwdg-container {
width: calc(100vw - 40px);
max-width: 810px;
}
@media (max-width: 480px) {
#atlwdg-container {
width: 100vw;
}
}
Bonus: Embedding on Confluence pages
Alternatively, the Issue Collector can also be embedded directly in Confluence pages.
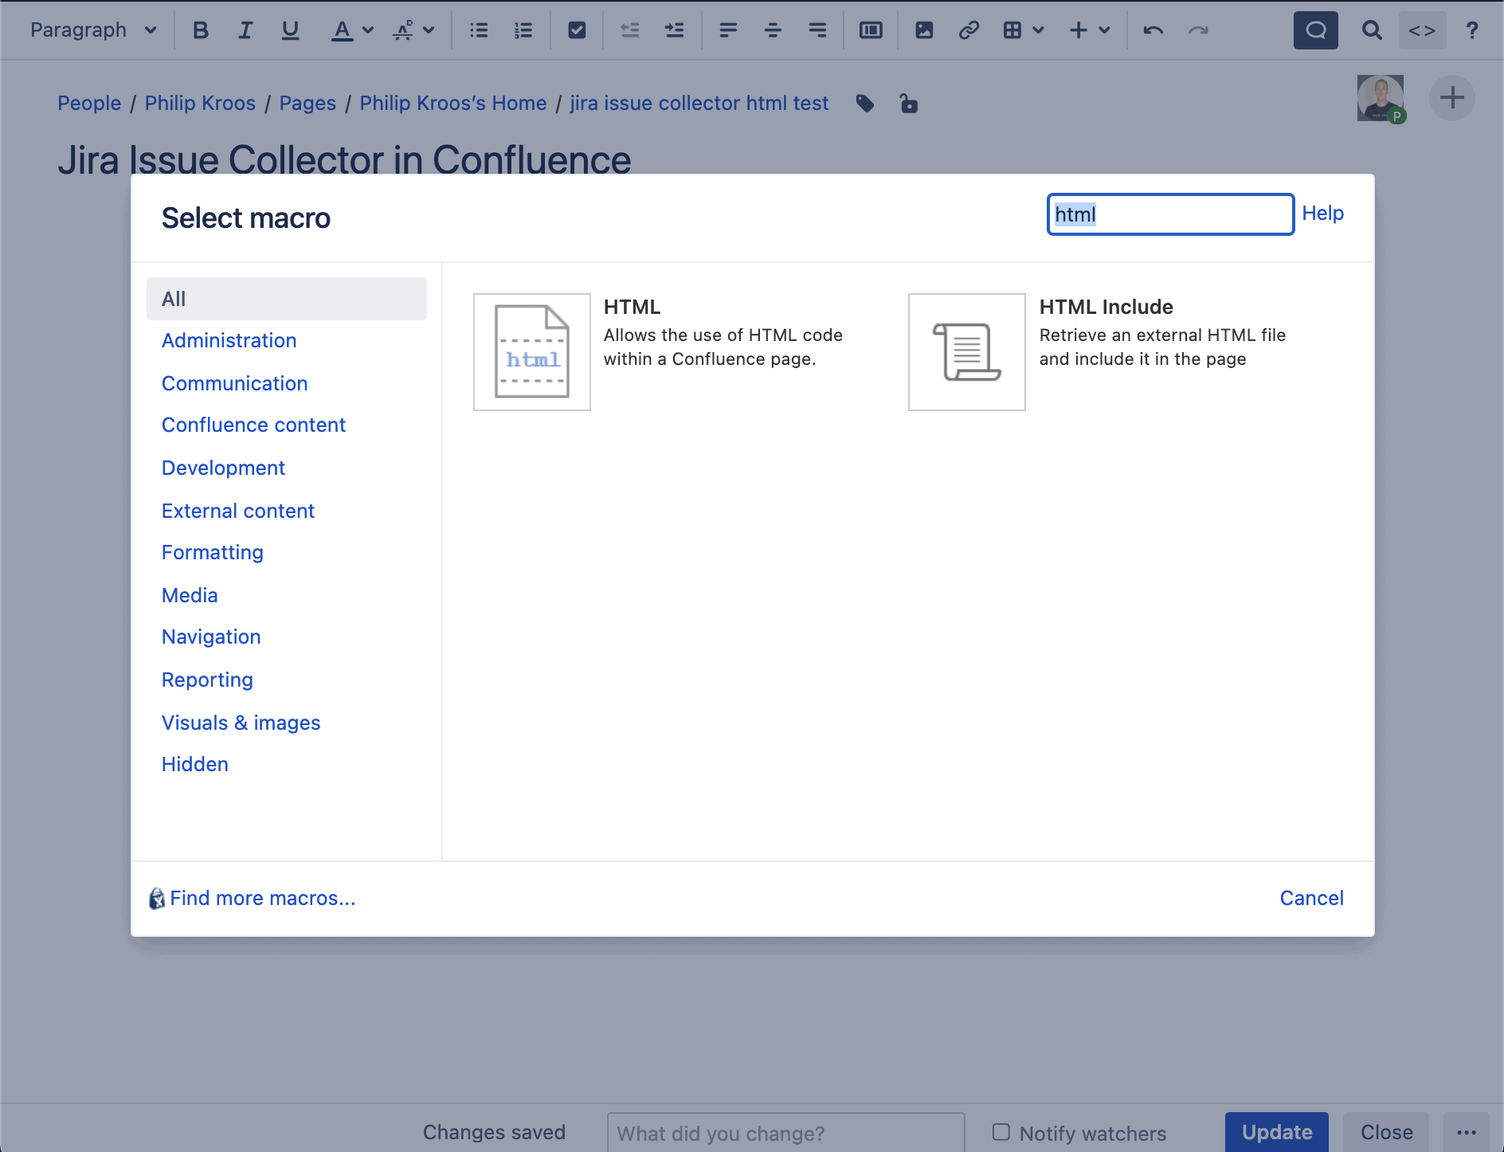
- To do this, first insert the "HTML" macro by searching for HTML under "other macros".
- In the HTML macro, you only need to insert the code copied from the Issue Collector.
- To then open the form with a simple button press, insert the following line of code directly under the Issue Collector script:
- <input type="button" style="color:green" id="myCustomTrigger" class="button" value="Click me" />
- Once the Confluence page is updated, the following button appears, which opens the issue collector when clicked. This allows a Jira ticket to be created directly on a Confluence page immediately and without any detours.
Summary & Outlook
Done! The application form is now embedded on your website or Confluence in the form of a Jira issue collector, and applicants can apply immediately with a Jira ticket. Of course, it is possible to use an issue collector for purposes other than applications. It is also conceivable to insert a button on specific Confluence pages or in templates to be able to create Jira tickets directly in meeting notes. Or you can embed an issue collector on Confluence pages that you use for onboarding new team members, so they can easily provide feedback or create support tickets.
If you would like to learn more about how to set up HR and recruiting processes in a company using Jira and Confluence, please take a look at our blog post.
If you still need detailed information, we are always happy to have a joint conversation, entirely without obligation and free of charge. As an Atlassian Platinum Solution Partner, we are happy to advise you on further solution finding. On our Atlassian Services page, you can learn more about our approach and methodology.